Coalesce is the first cloud-native data transformation solution built for Snowflake, helping data teams tackle transformations at scale by bringing together the flexibility of code, the efficiency of automation, and the speed of an intuitive GUI.
This guide is designed to help you explore the Coalesce interface and learn how to easily transform and model your data with our core capabilities.
What you'll need
- A laptop
- Chromium-based browser (Chrome or Edge)
- Internet connection
What you'll learn
- How to navigate the Coalesce interface
- How to add data sources to your graph
- How to build Data Vault entities
- How to prepare your data for transformations
- How to join tables
- How to apply transformations to individual and multiple columns at once
- How to build out a Dimension Nodes
- How to make changes to your data and propagate changes across pipelines
Coalesce enables users to build directed acyclic graphs (DAGs) and generate tested, up-to-date datasets for their data consumers. By using Coalesce to address common data management and transformation challenges in an automated, efficient, and scalable manner, data teams can create and manage data pipelines more easily, particularly in enterprise environments.
Uniquely built for efficient transformations
Coalesce's unique architecture is built on the concept of column-aware metadata, meaning that the platform collects, manages, and uses column- and table-level information to help users designing and deploying data warehouses more effectively. This empowers data teams to define data warehouses with column-level understanding, standardize transformations with data patterns (templates) and model data at the column level.
Coalesce also uses column metadata to track past, current, and desired deployment states of data warehouses over time. This provides unparalleled visibility and control of change management workflows, allowing data teams to build and review plans before deploying changes to data warehouses.
About this use case
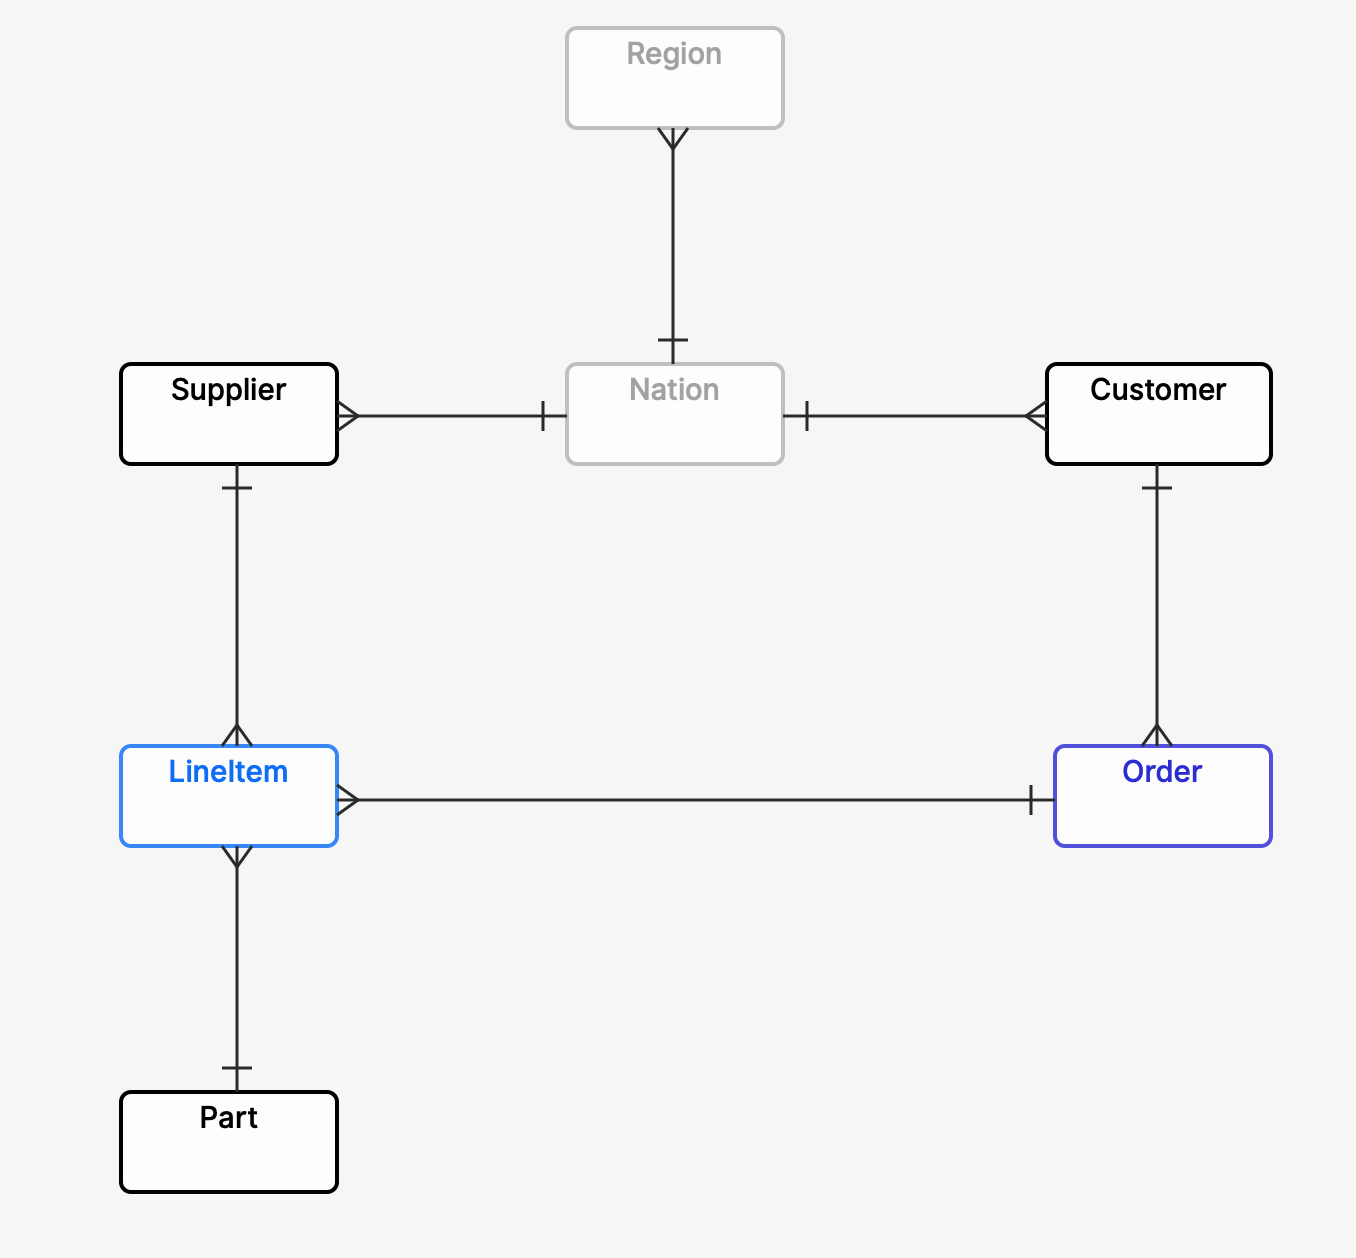
The exercises in this guide use the sample data provided with your trial Snowflake account, which is focused on fictitious commercial business data including supplier, customer and orders information. For a full overview of the TPC-H schema, please visit Snowflake's documentation.

Let's get familiar with Coalesce by walking through the basic components of the user interface.
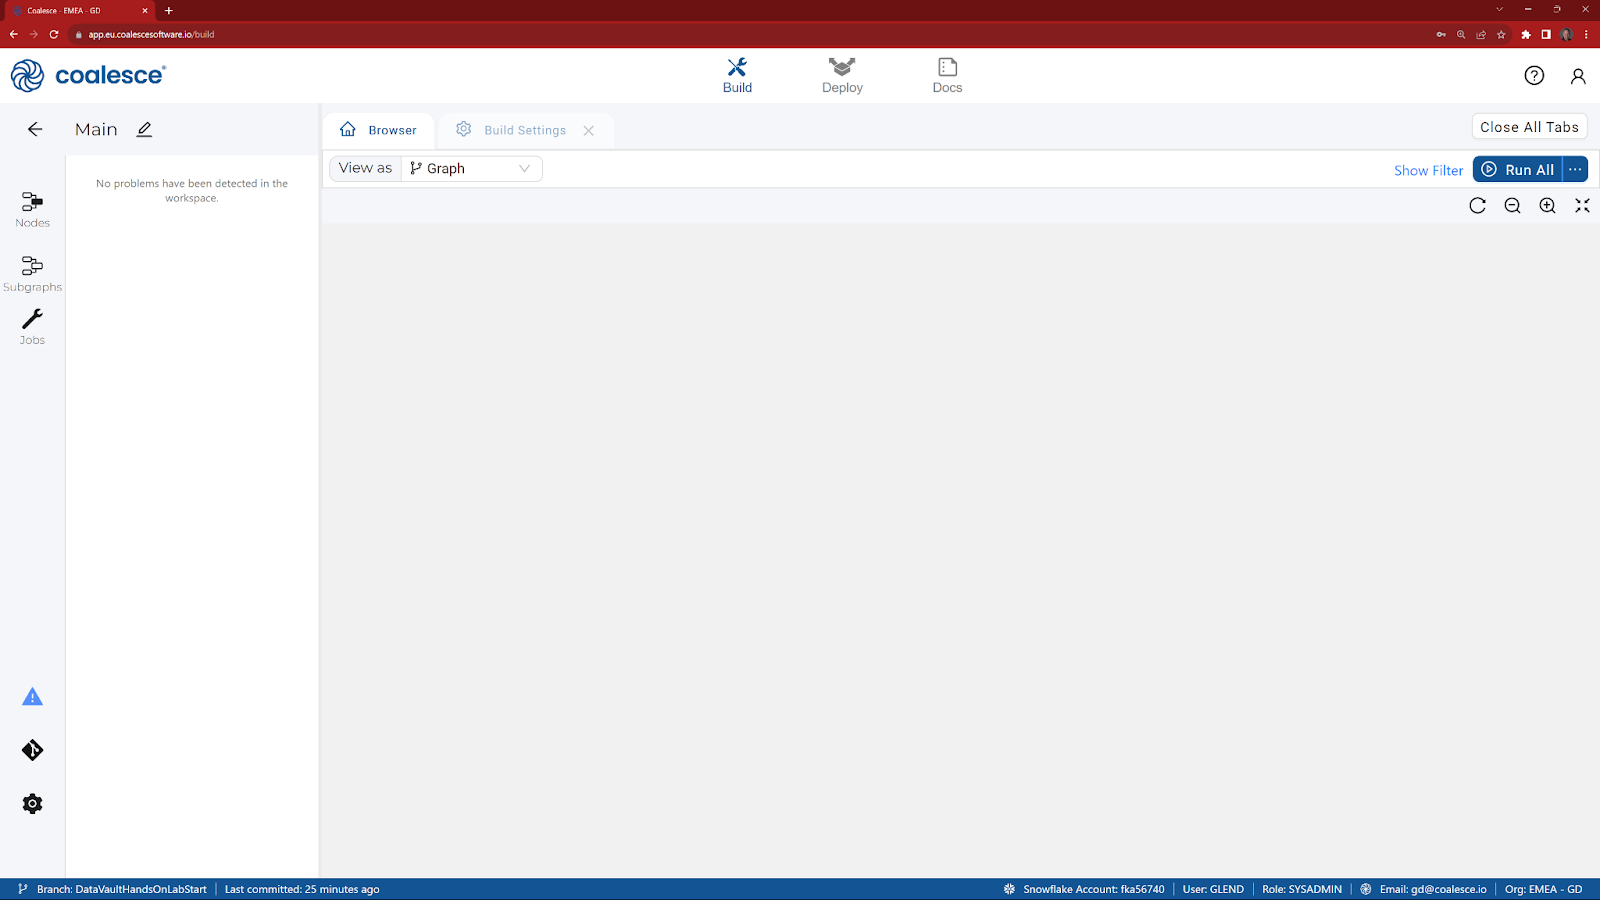
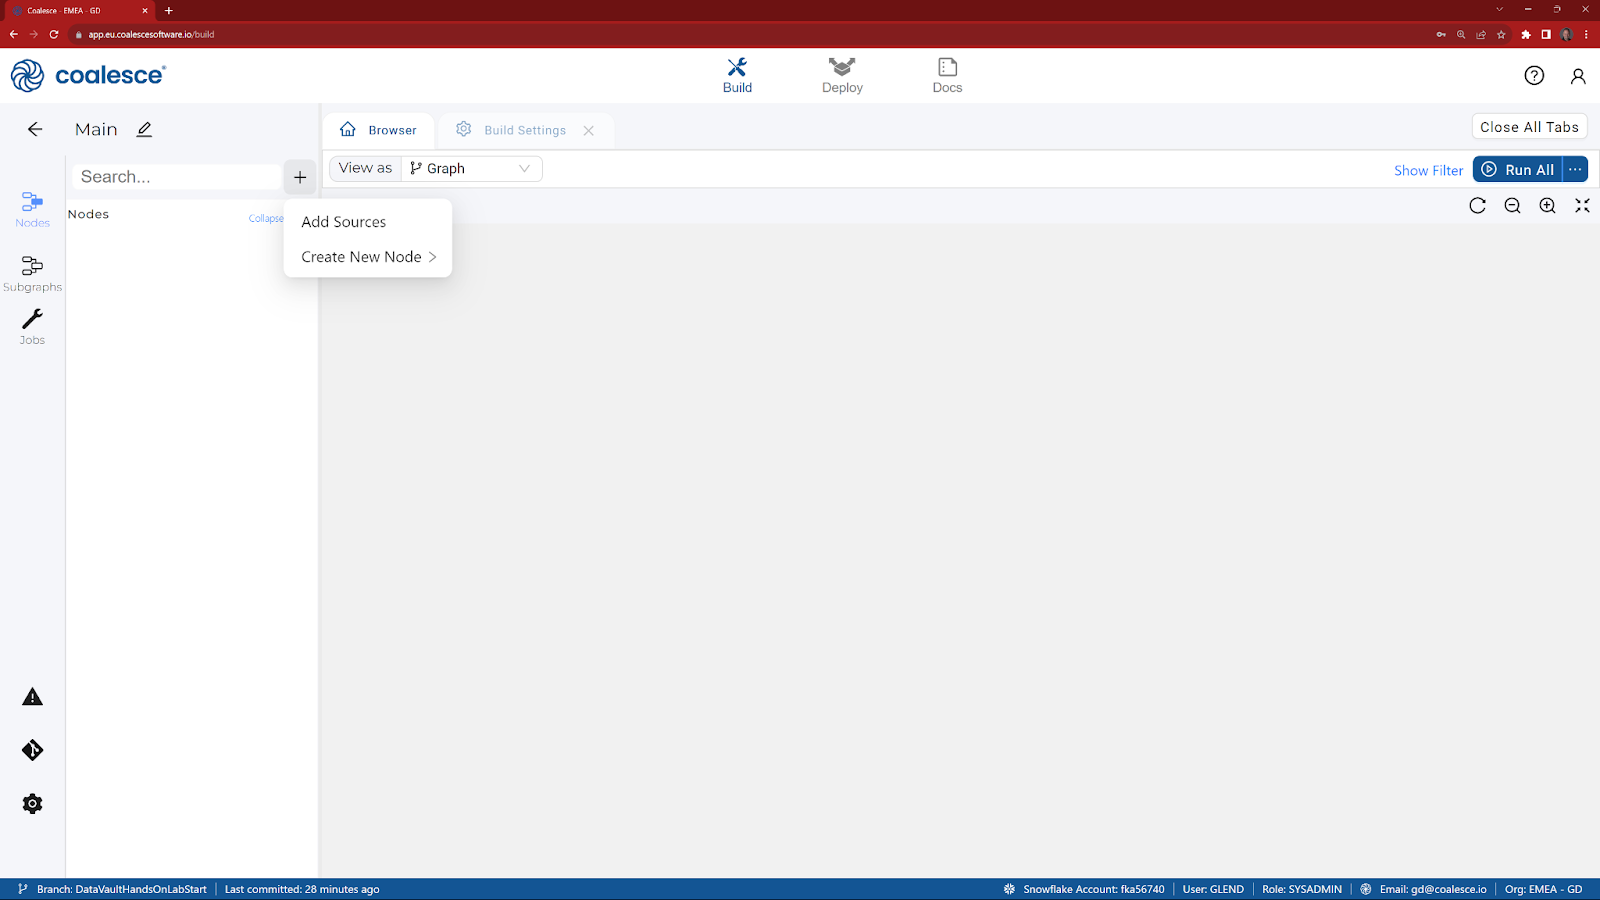
There are three interfaces that you can switch between - Build, Deploy & Docs. In the Build interface, you can create, modify and publish nodes that will transform your data. Nodes are visual representations of objects in Snowflake that can be arranged to create a graph (Directed Acyclic Graph, or DAG).
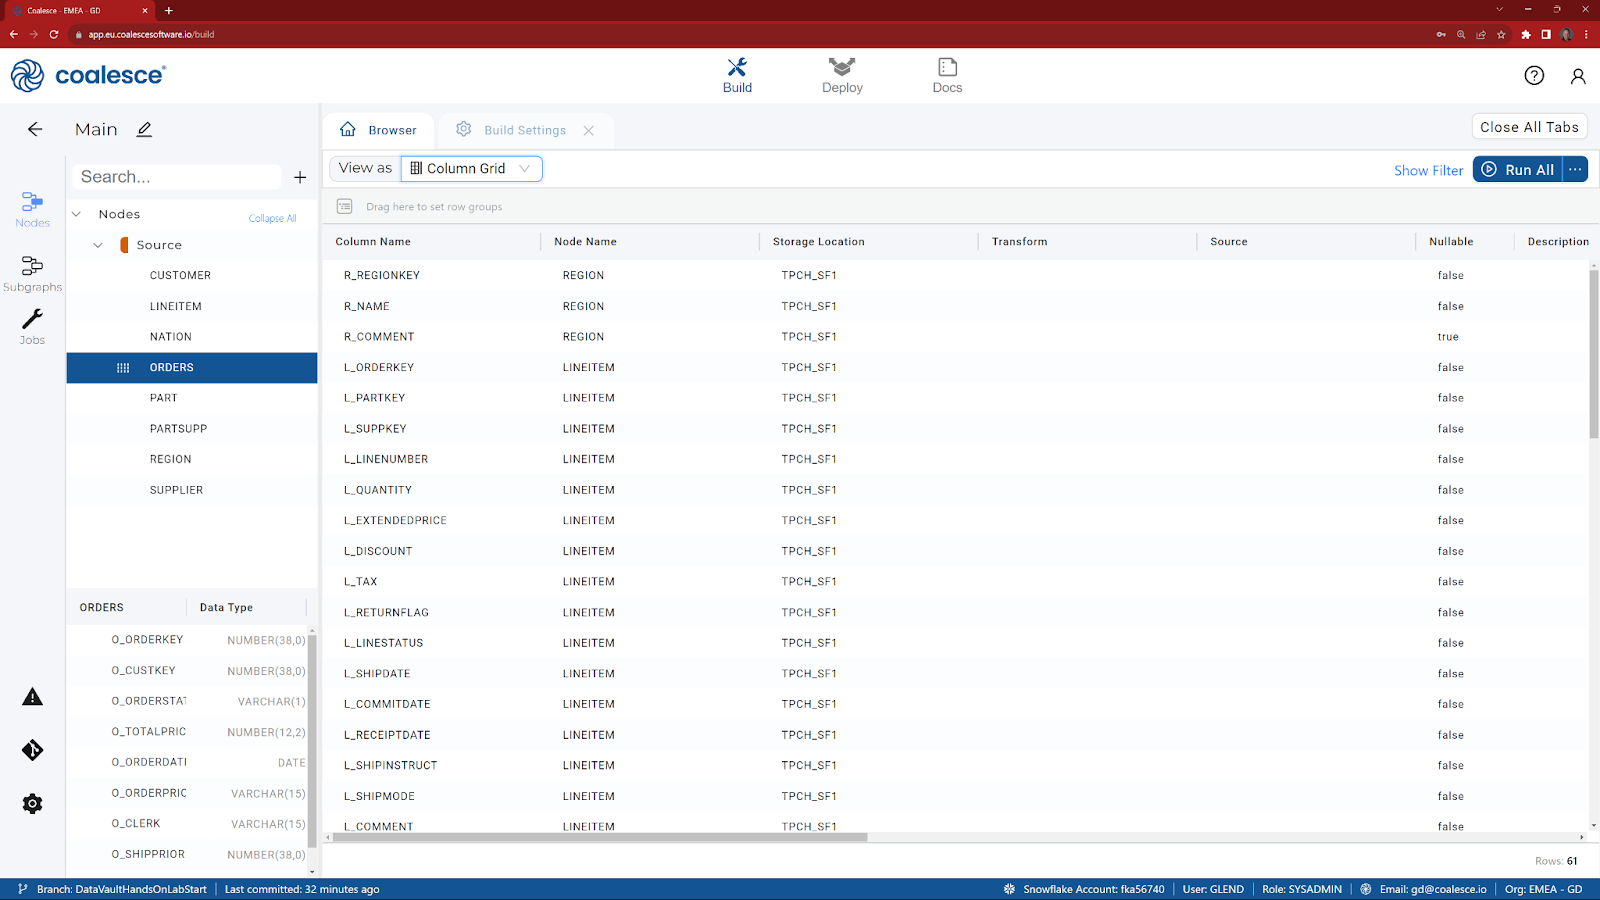
- In the Browser tab of the Build interface, you can visualize your node graph using the Graph, Node Grid, and Column Grid views. In the upper right hand corner, there is a person-shaped icon where you can manage your account and user settings.
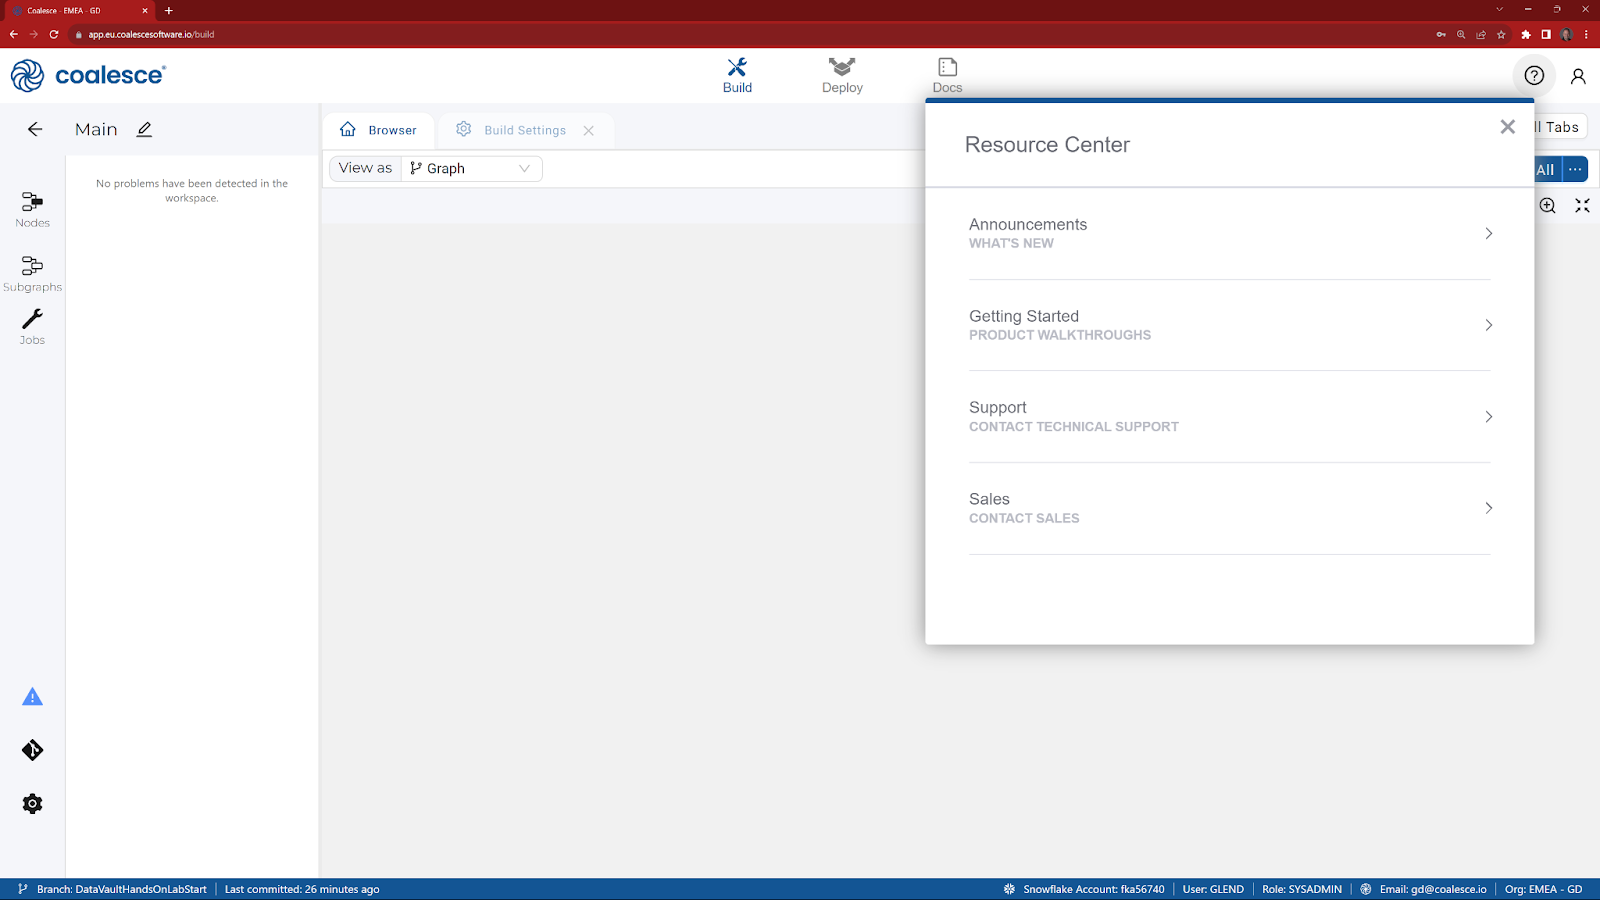
- By clicking the question mark icon, you can access the Resource Center to find product guides, view announcements, request support, and share feedback.
- In the Browser tab of the Build interface, you'll build your pipelines using Nodes. Nodes are visual representations of objects in Snowflake.

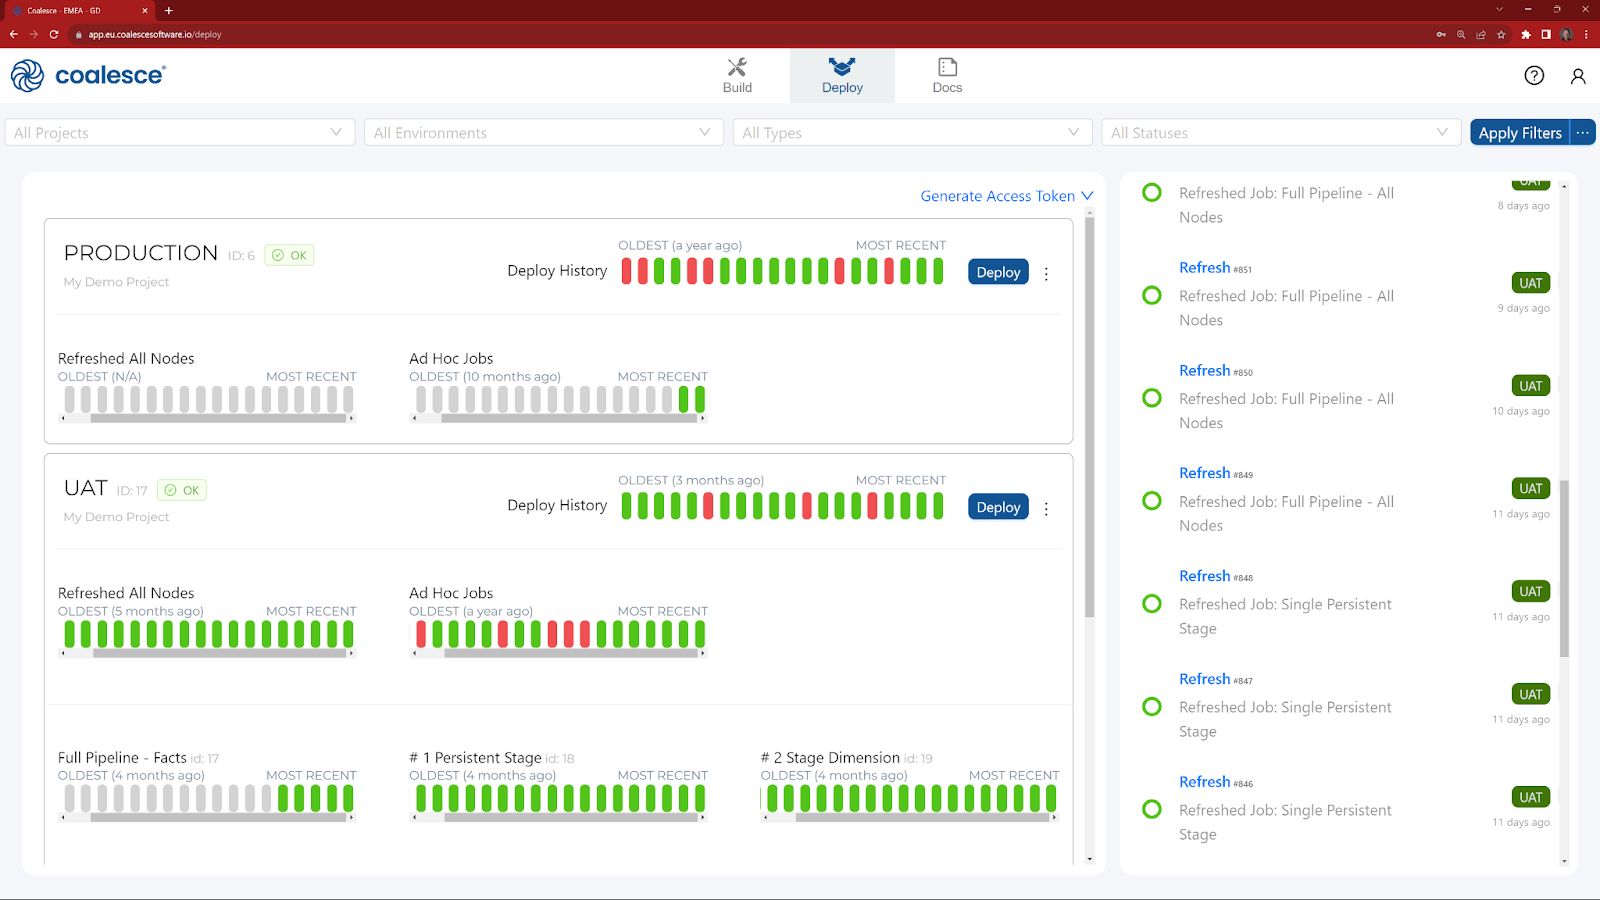
- Next to the Build interface is the Deploy interface. This is where you will push your pipeline to other environments such as UAT or Production. You will also be able to review the status of any jobs that have previously been run.
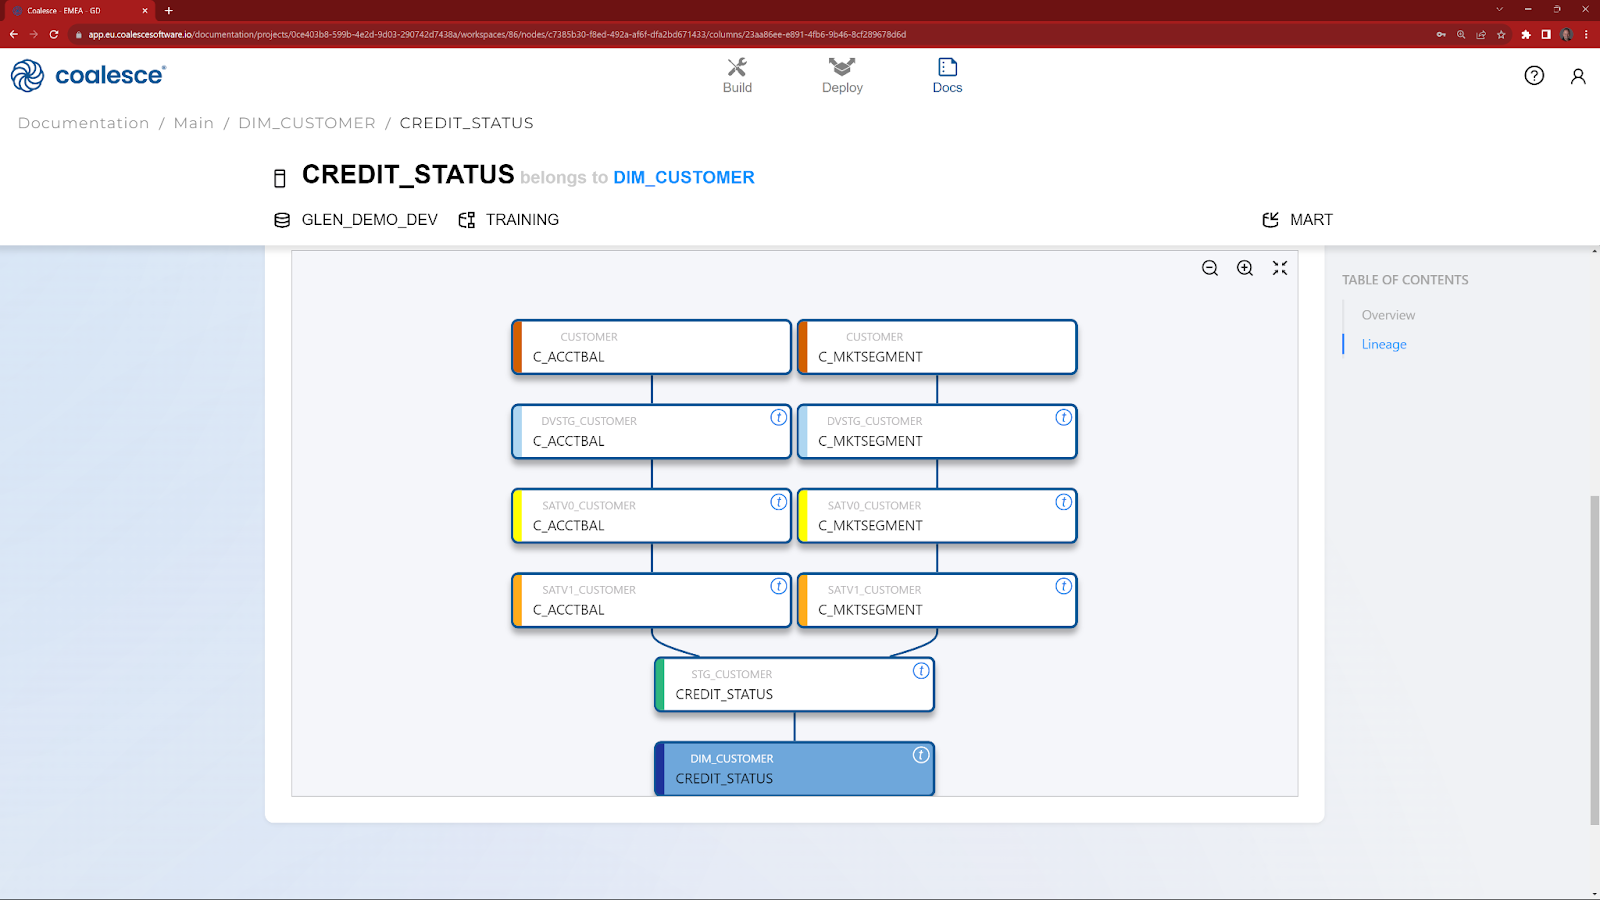
- Next to the Deploy interface is the Docs interface. At the end of the Hands On Lab, this is where you will be able to review the automatically generated documentation, including column level lineage.
Let's start to build a Graph by adding data in the form of Source Nodes.
- Start in the Build interface and click on Nodes in the left sidebar (if not already open). Click the + icon and select Add Sources.
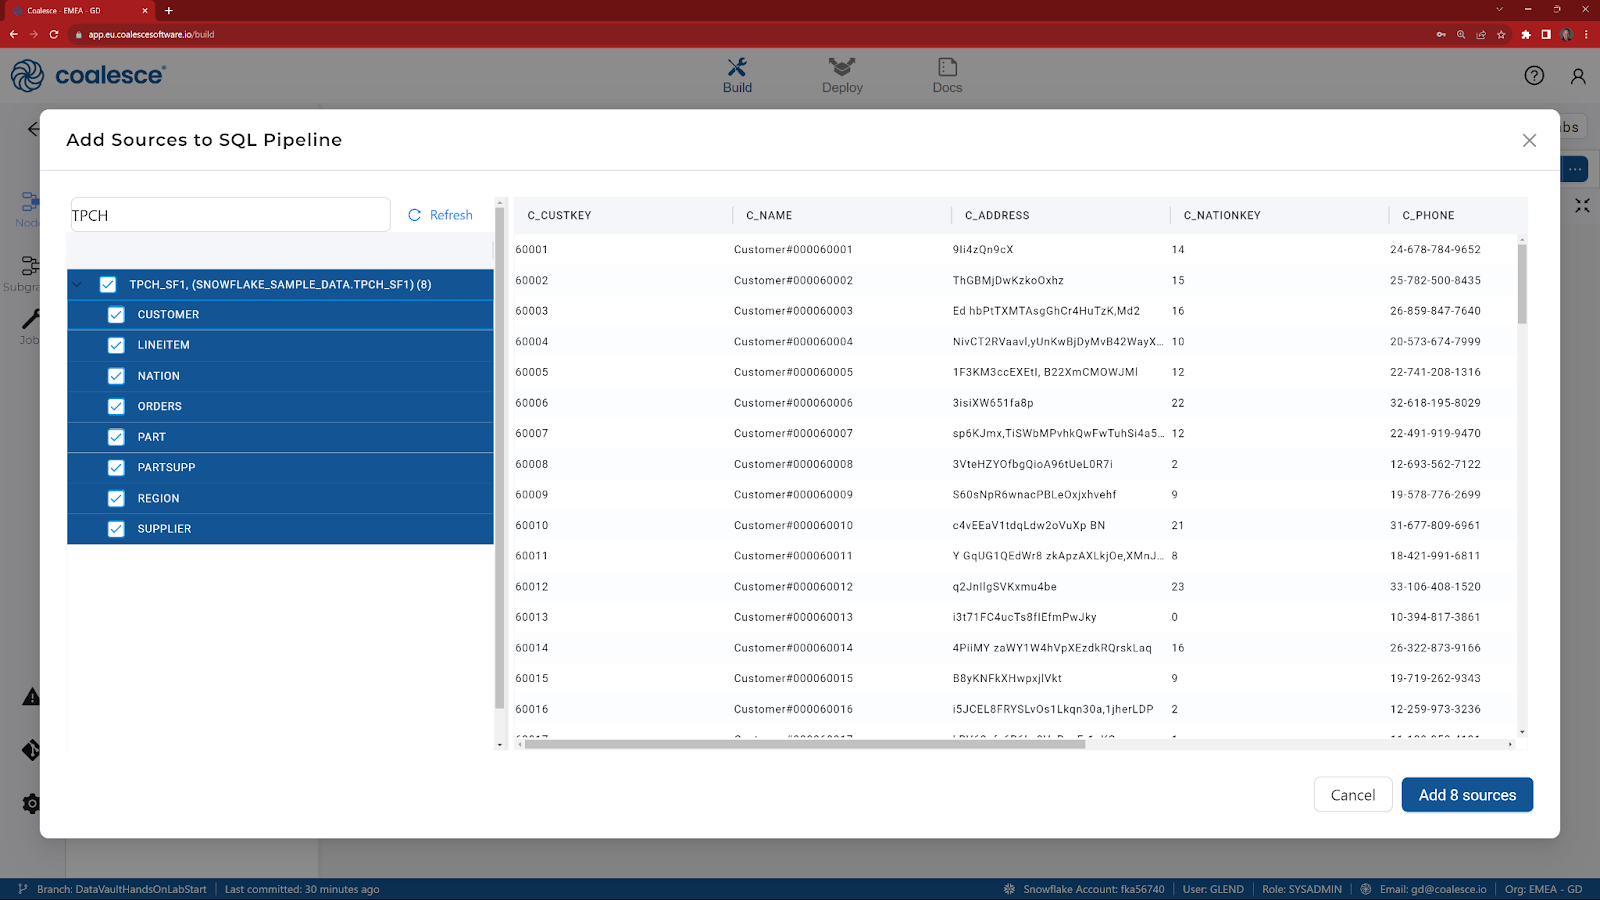
- Click to expand the tables within SNOWFLAKE_SAMPLE DATABASE.TPCH_SF1 and select all of the corresponding source tables underneath (8 tables total). Click Add Sources on the bottom right to add the sources to your pipeline.
- You'll now see your graph populated with your Source nodes.
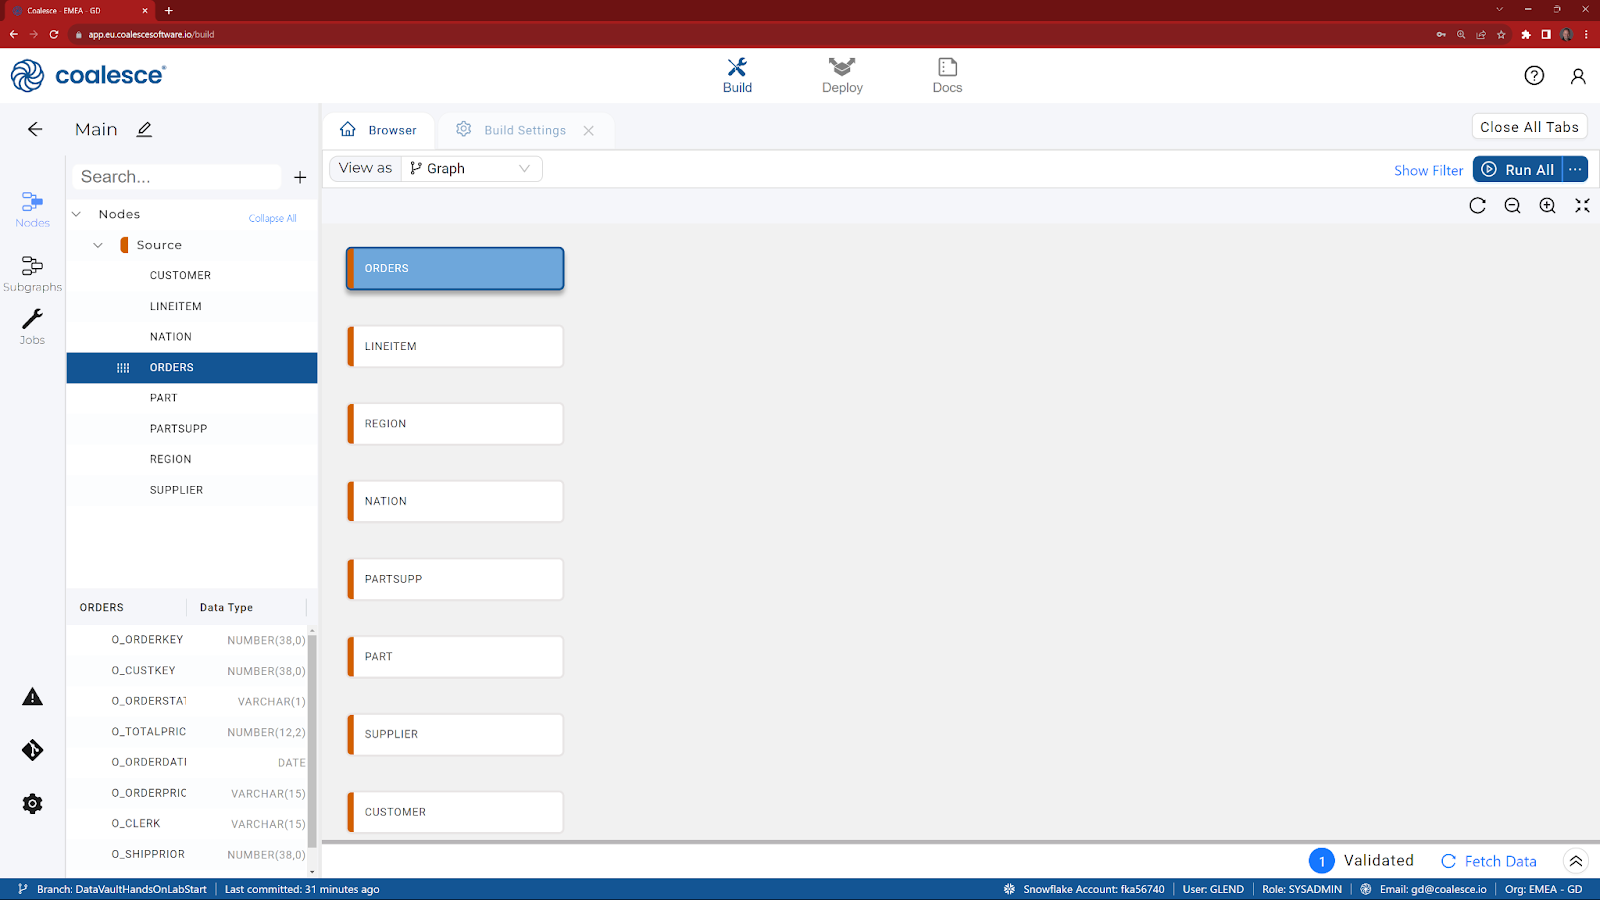
- If you click on the View As selector, you can change the Browser tab to display your DAG as a Node or Column grid.
Now that you've added your Source nodes, let's prepare the data by adding Data Vault Stage nodes. Data Vault Stage nodes represent staging views within Snowflake where you will define and build your hash keys that will be used later on in your Hub, Link and Satellites. They also contain pre-configured load date and record source system columns.
Let's start by adding a standardized "data vault stage layer" for all sources.
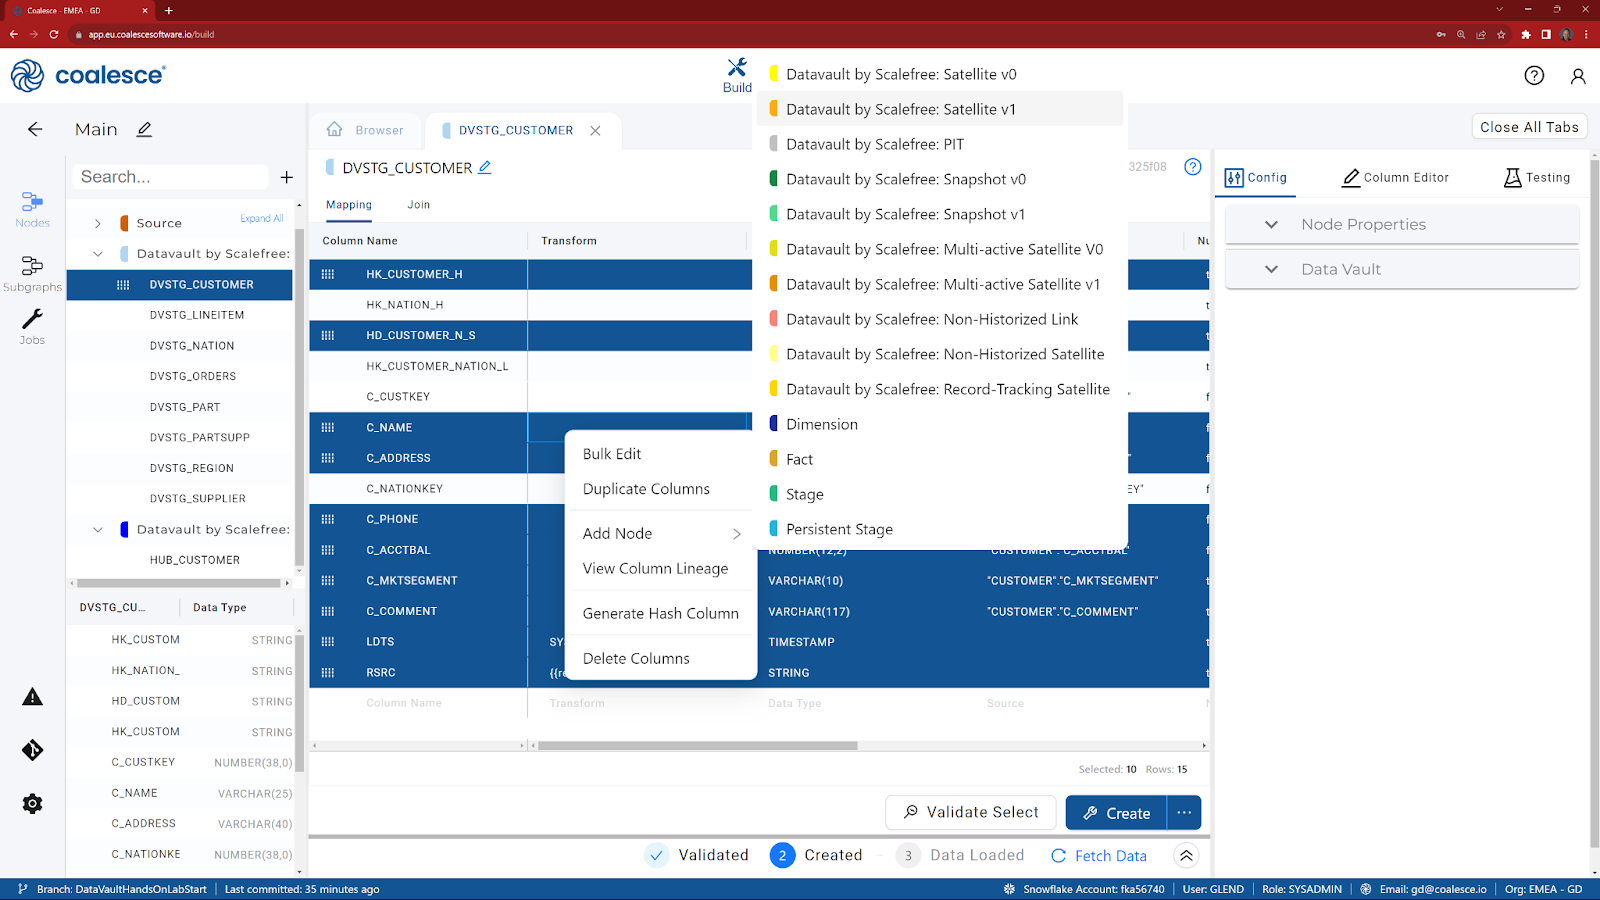
- Press and hold the Shift key to multi-select all of your Source nodes. Then right click and select Add Node > Datavault by Scalefree: Stage from the drop down menu.
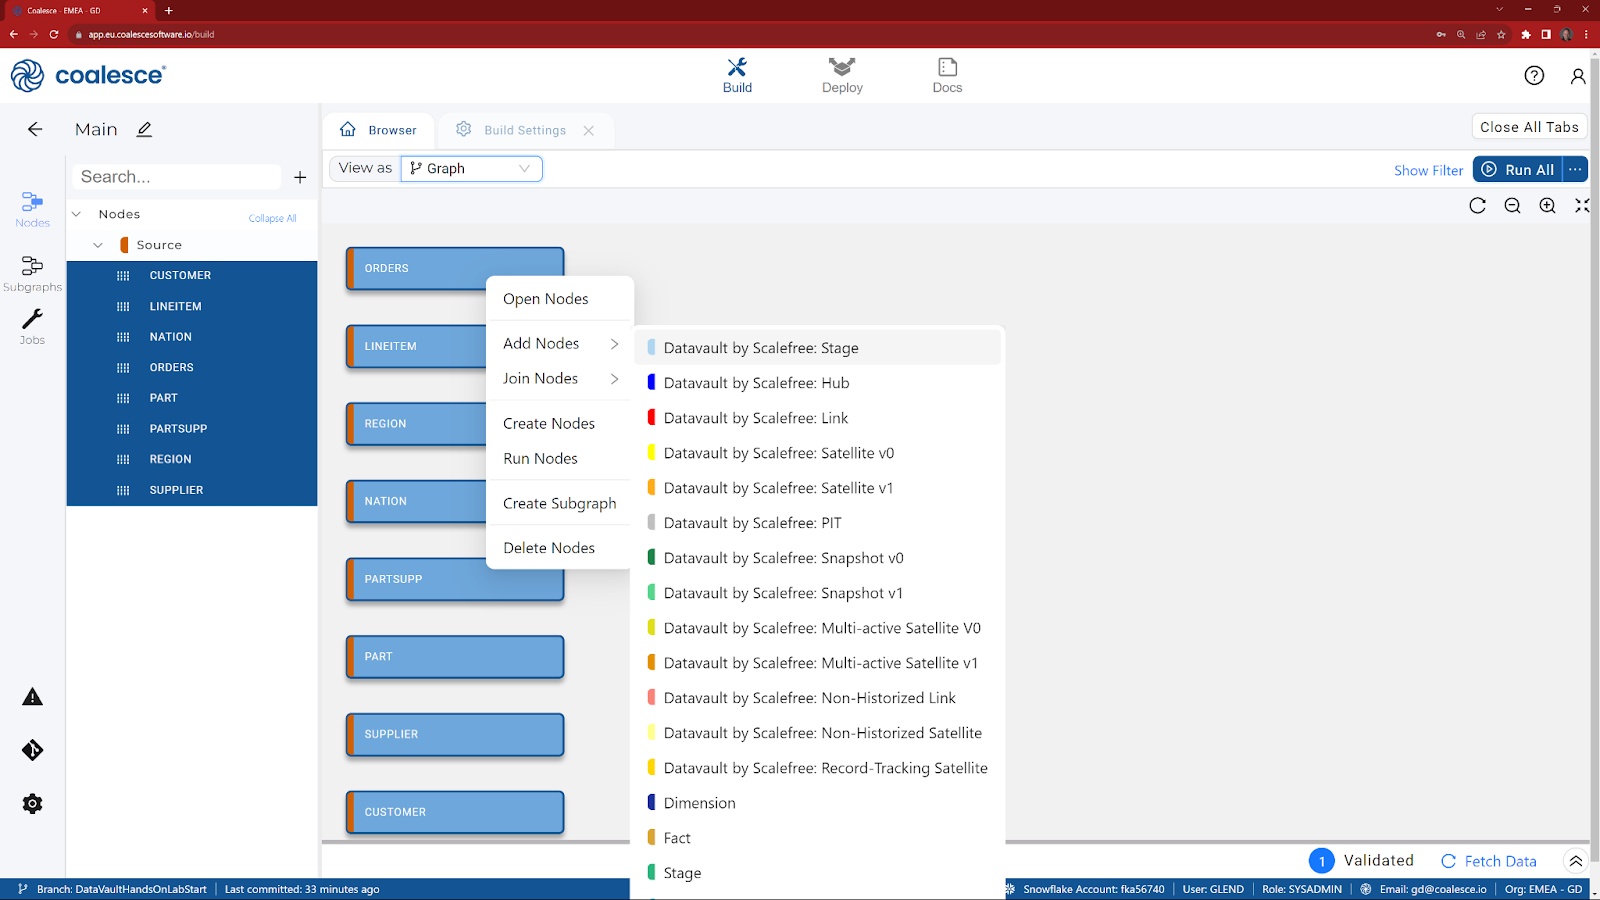
- At the top right side of the screen, press the ellipsis to select Create All from the menu.
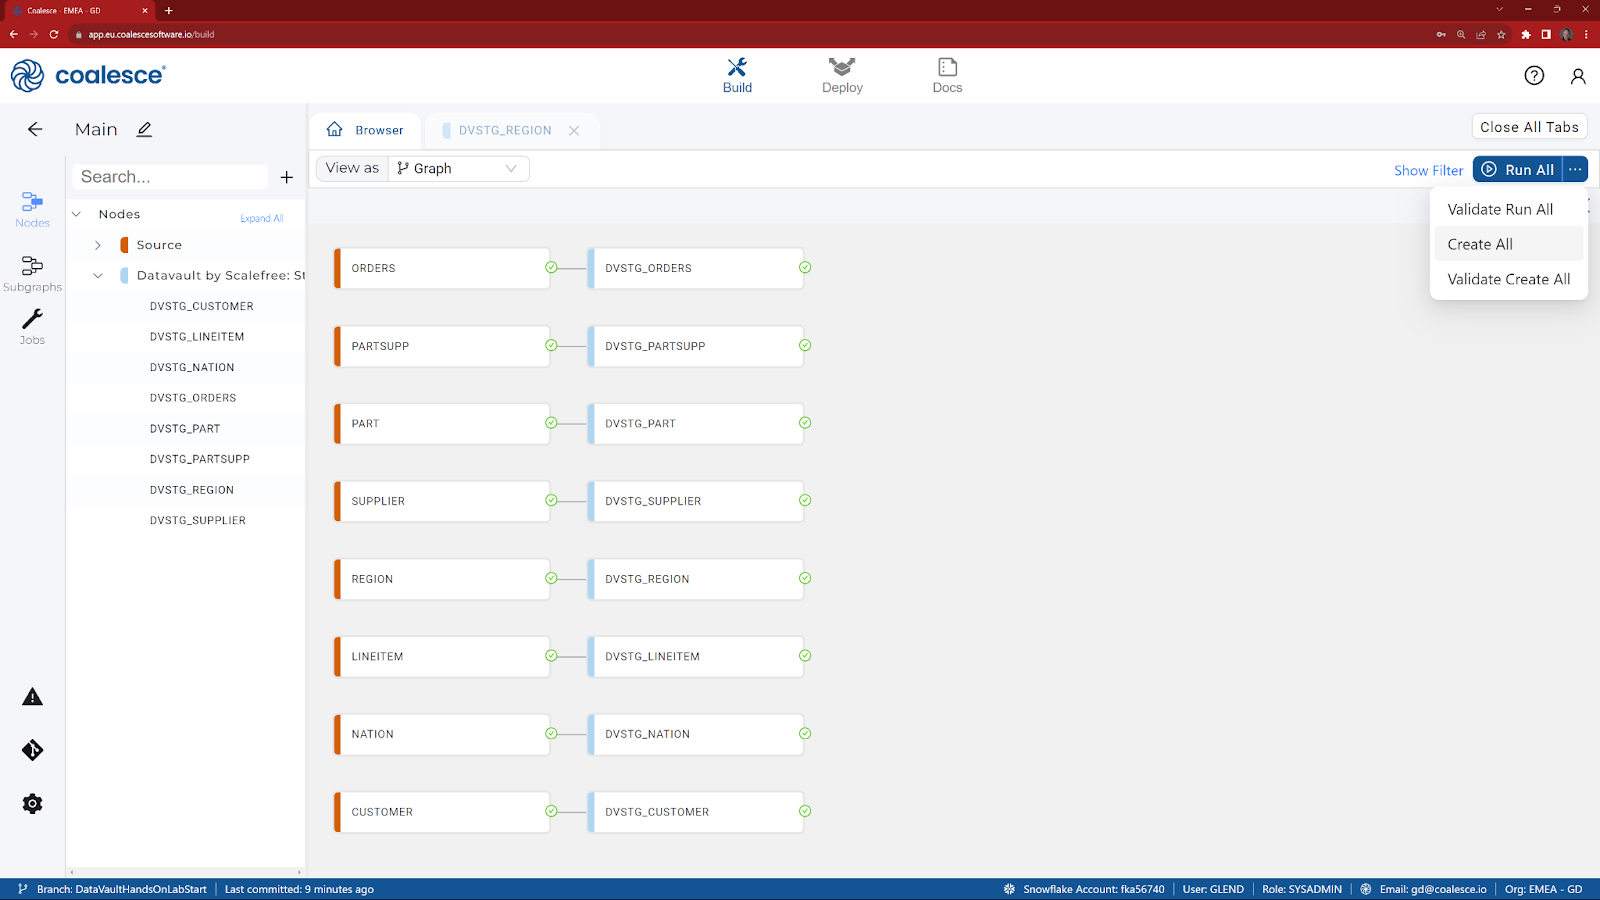
Now that we have a Data Vault staging layer, let's review one of the nodes.
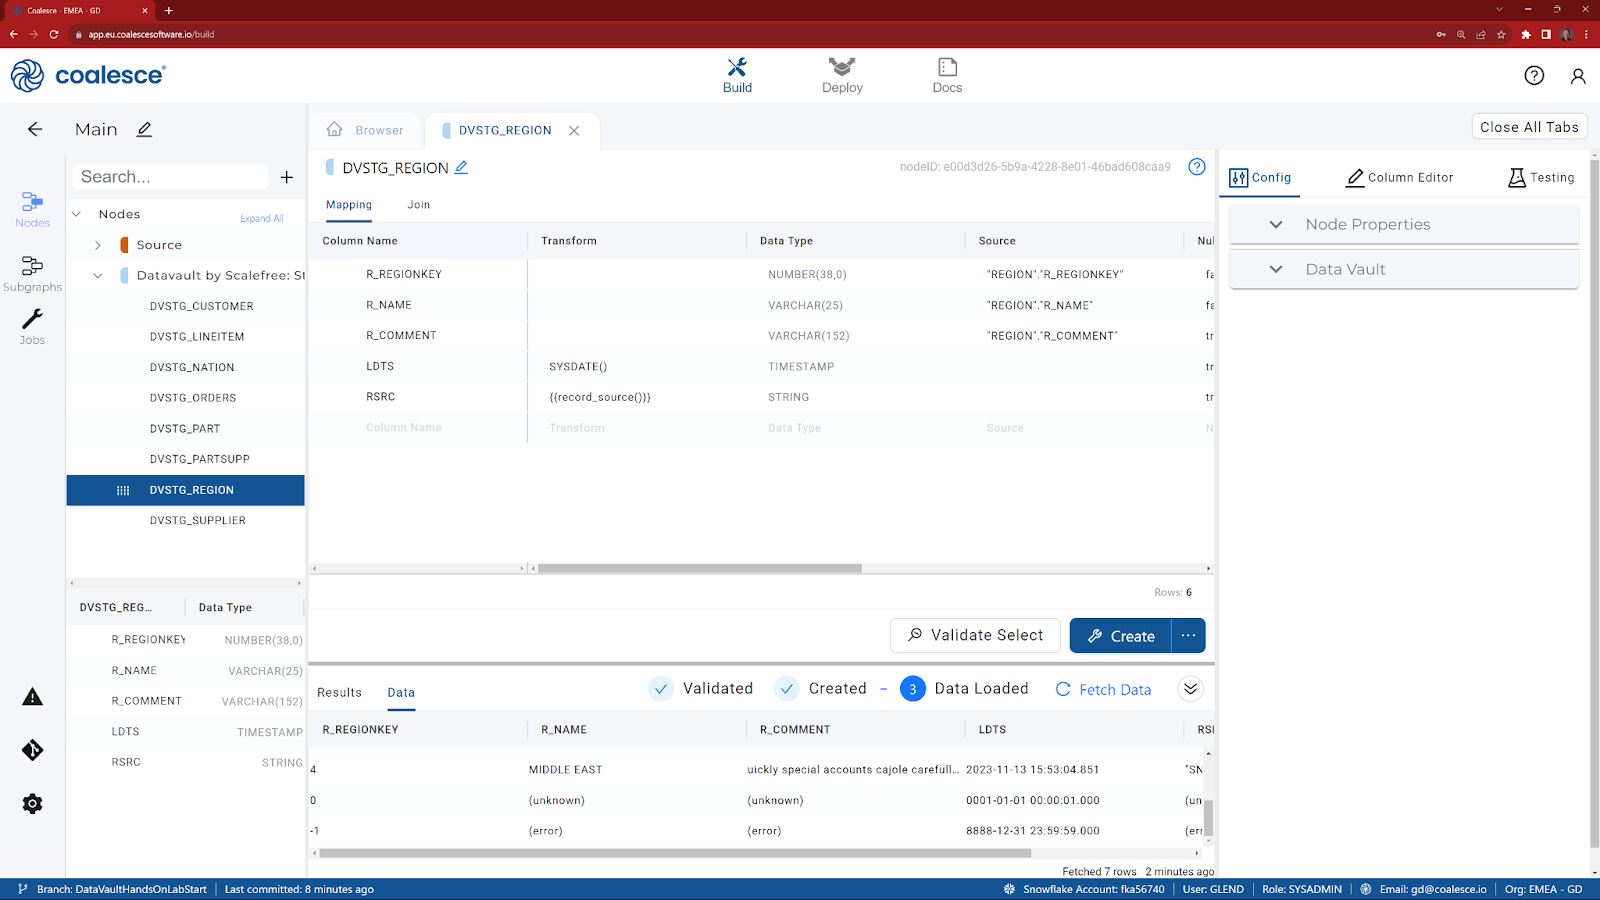
- Double click on the DVSTG_REGION node to show the columns. Note the addition of two new columns (LDTS and RSRC) that have automatically been added.
- Click on Fetch Data to display the data that the view has returned and scroll to the bottom to see the two ghost records (‘Error' and ‘Unknown'), that have been added by default.
For today's session, we are going to focus on our CUSTOMER table and build a Hub, Satellite (and optionally, a Link) from this source. Before we can proceed onto the next node types, we need to further enhance our existing Customer Data Vault Staging by adding our hash columns.
- Click on Close All Tabs, to close any node that you may have been reviewing.
- From the Browser tab, double click on DVSTG_CUSTOMER to reveal the list of columns.
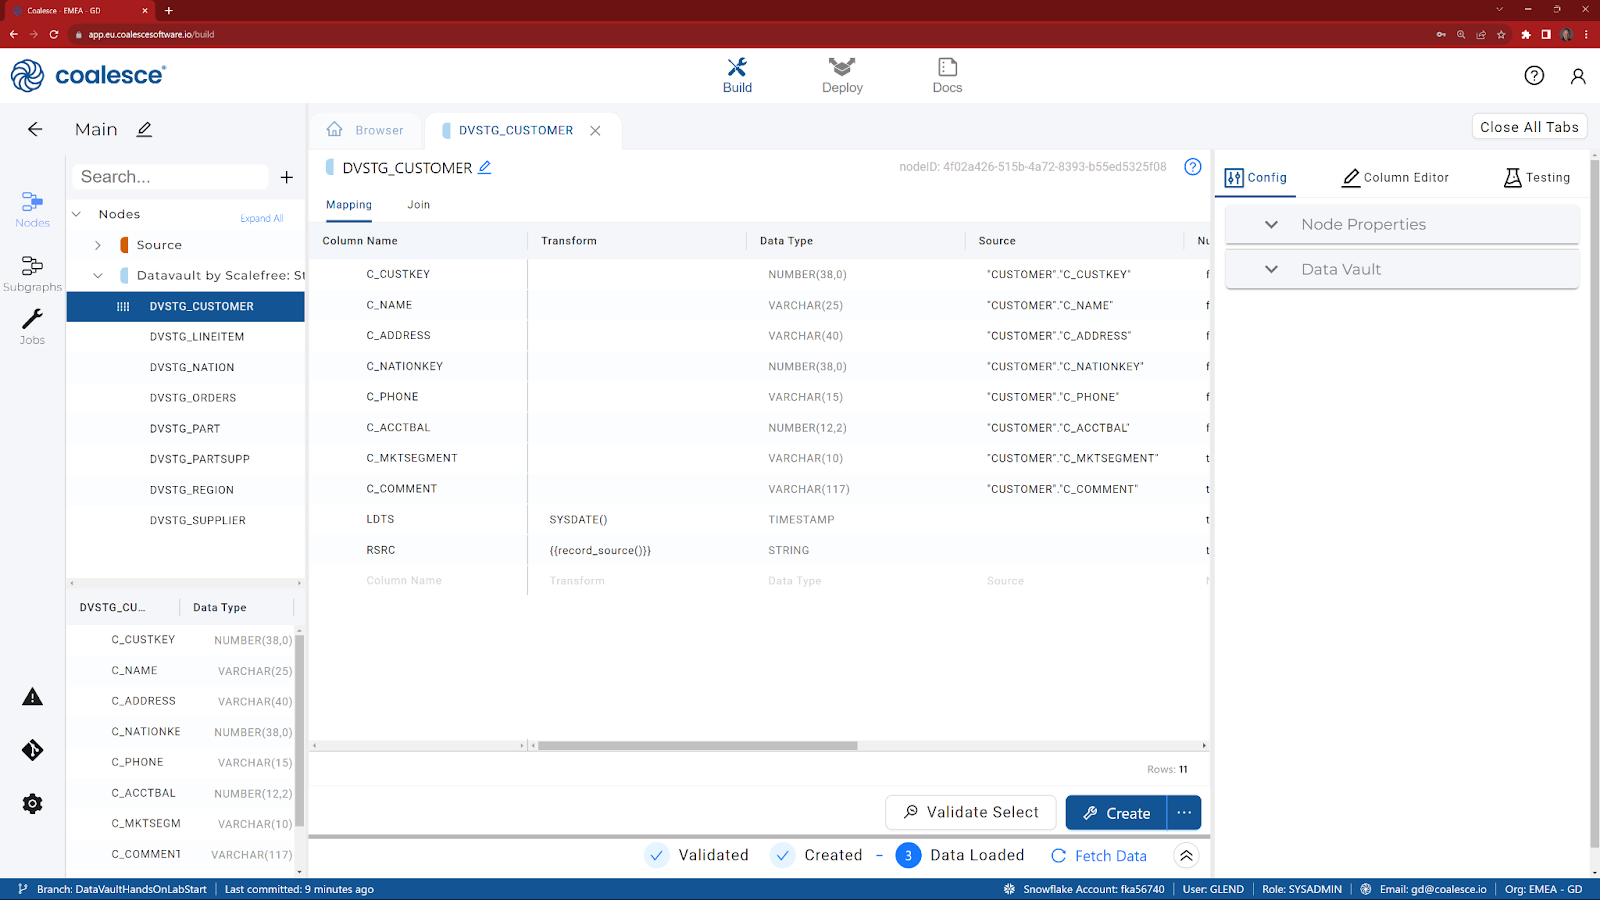
Creating a Hub Hash Key
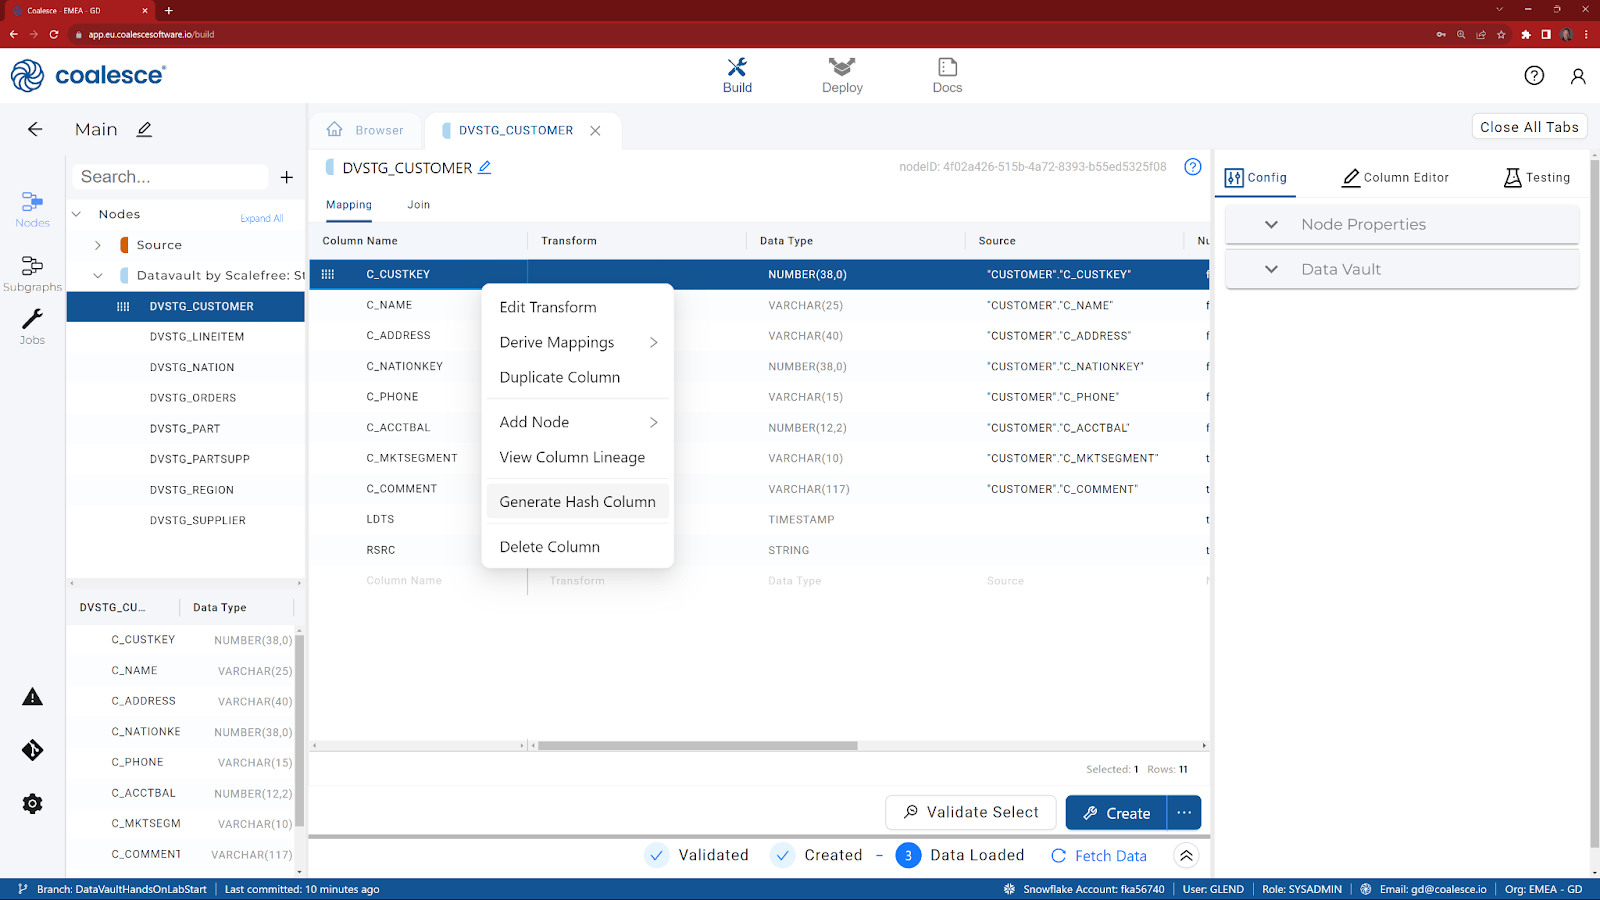
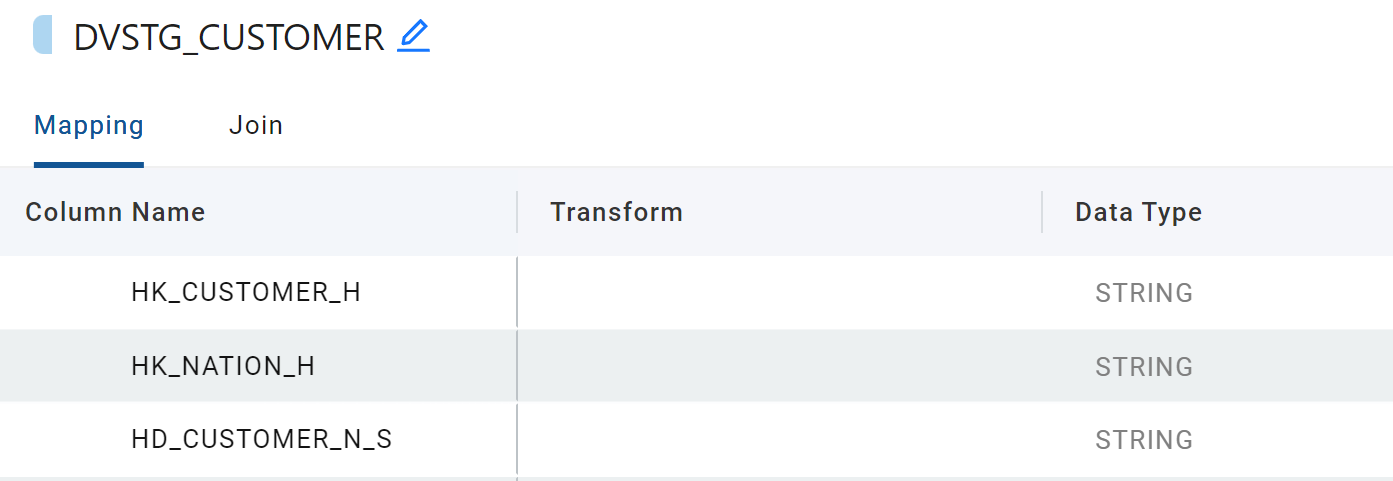
Let's start with the most important column - the Hub Hash Key. To keep things simple, we are going to choose C_CUSTKEY for our business key, as it uniquely identifies a row in the source table.
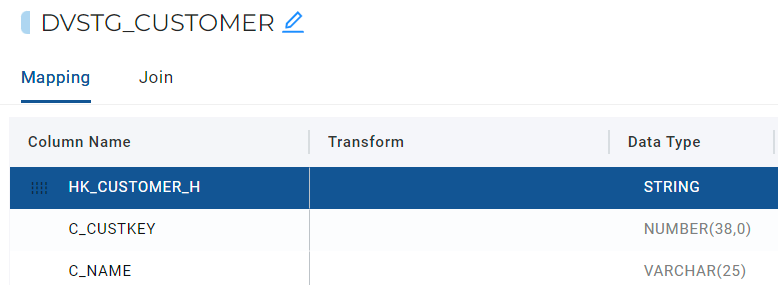
- Right click on C_CUSTKEY and choose Generate Hash Column, from the options. A new column will now appear at the bottom with a default name of GH.
- Double click on the new column name and change it to HK_CUSTOMER_H.
- Optionally, click on the new column and drag it to the top of the grid.
Creating a Change Hash Key
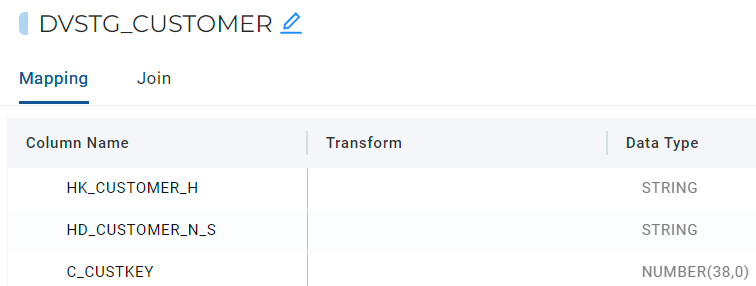
We now need to choose the columns that we want to be included in our Change Hash Key for our Customer Satellite. We are going to choose all the other columns relating to Customer that begin with C_ excluding our Hub Hash Key(s).
- With the CTRL key pressed, click on C_NAME, C_ADDRESS, C_PHONE, C_ACCTBAL, C_MKTSEGMENT and C_COMMENT.
- Right click on any one of the selected columns and choose Generate Hash Column. Again, a new column will now appear at the bottom with a default name of GH.
- Double click on the new column name and change it to HD_CUSTOMER_N_S.
- Optionally, click on the new column and drag it to the top of the grid, under the Hub Hash Key.
(Optional) Building a Nation Hub Hash Key
As our Customer data contains a foreign key to our Nation data, we could choose to build another Hub Hash Key, to act as further source to a future Nation Hub.
- Right click on C_NATIONKEY and choose Generate Hash Column, from the options. A new column will now appear at the bottom with a default name of GH.
- Double click on the new column name and change it to HK_NATION_H.
- Optionally, click on the new column and drag it to the top of the grid (just underneath the Customer Hub Hash Key).
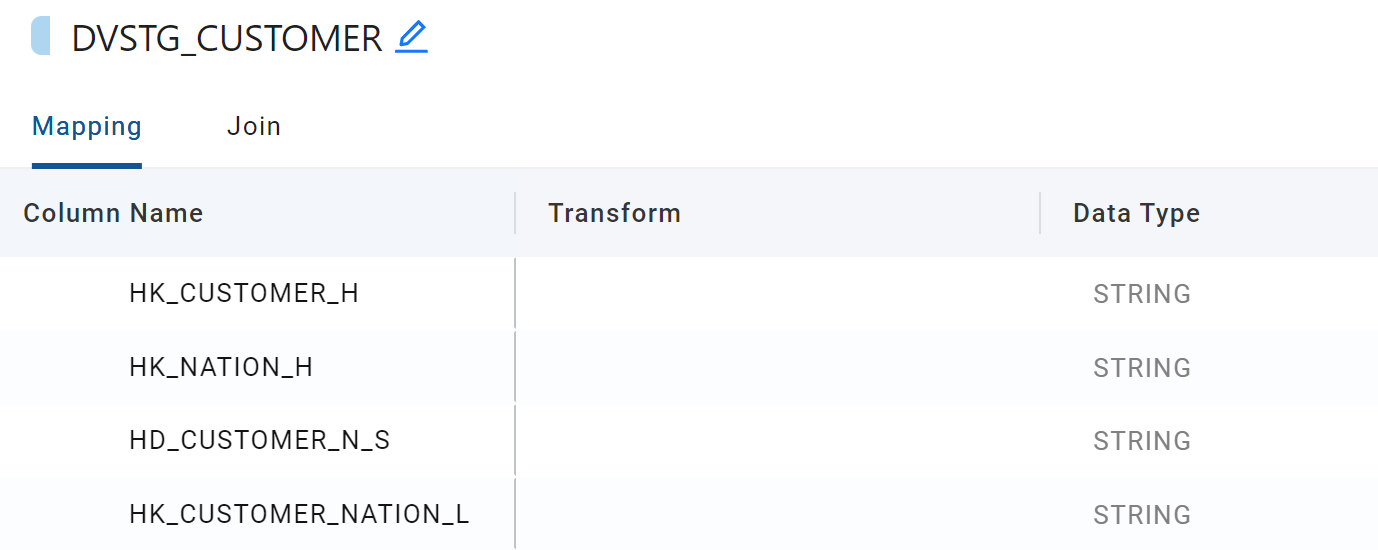
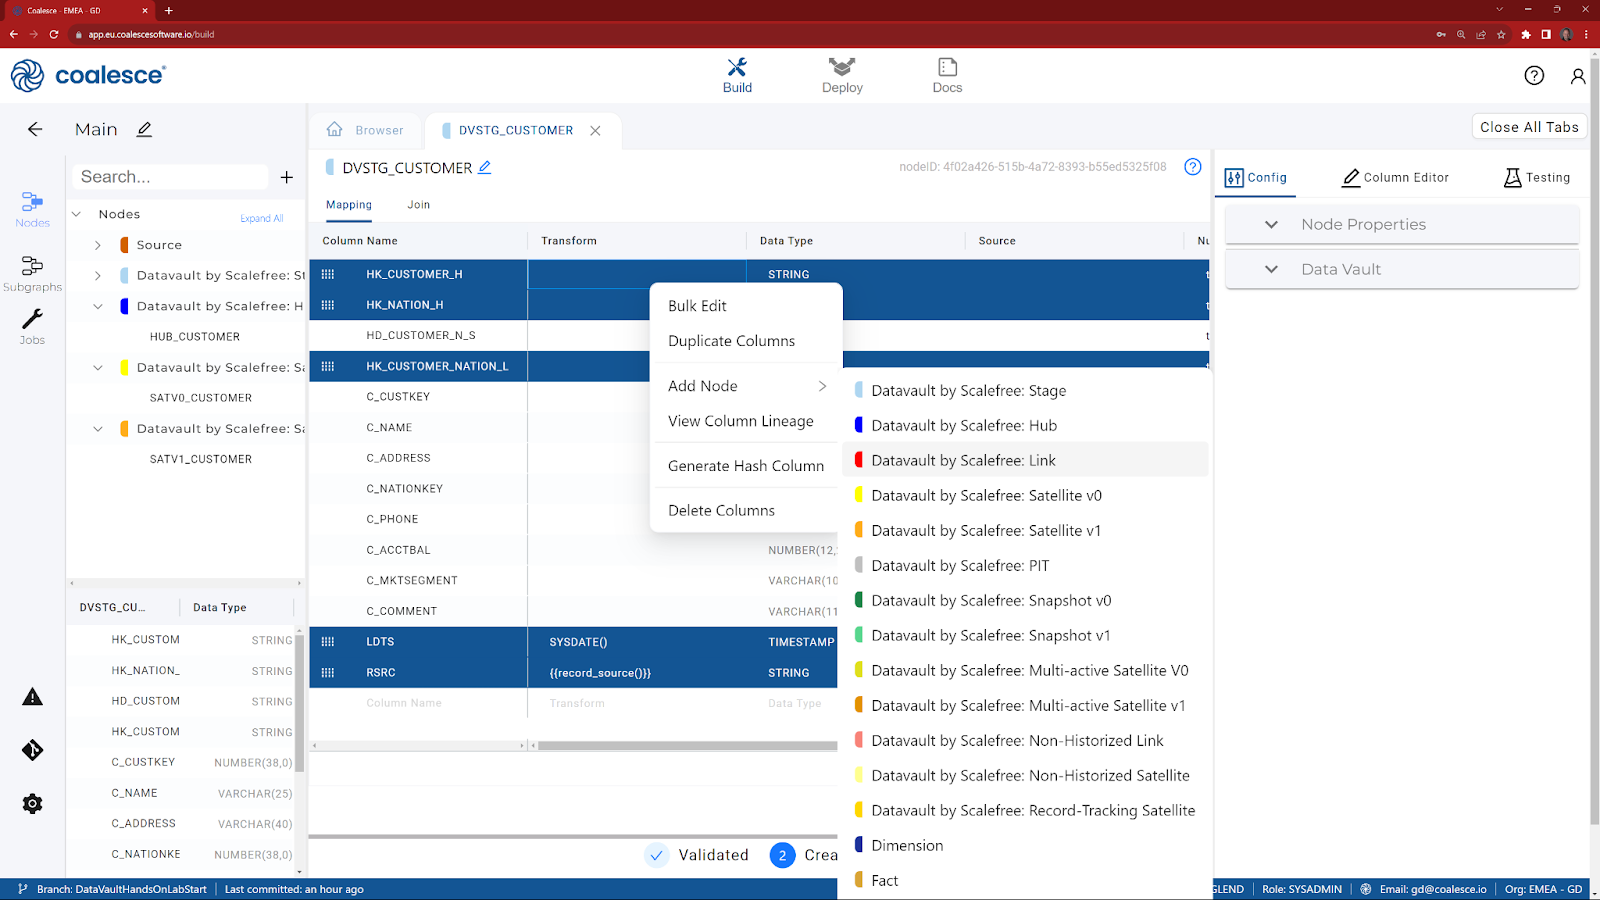
(Optional) Building a Link Hash Key
For the purpose of linking our Customer Hub to a future Nation Hub, we would need to hash both of our business keys to generate a Link Hash Key.
- With the CTRL key pressed, click on C_CUSTKEY and C_NATIONKEY.
- From the options, choose Generate Hash Column. A new column will now appear at the bottom with a default name of GH.
- Rename this column to HK_CUSTOMER_NATION_L
- Optionally, click on the new column and drag it to the top of the grid (just underneath the Change Hash Key)
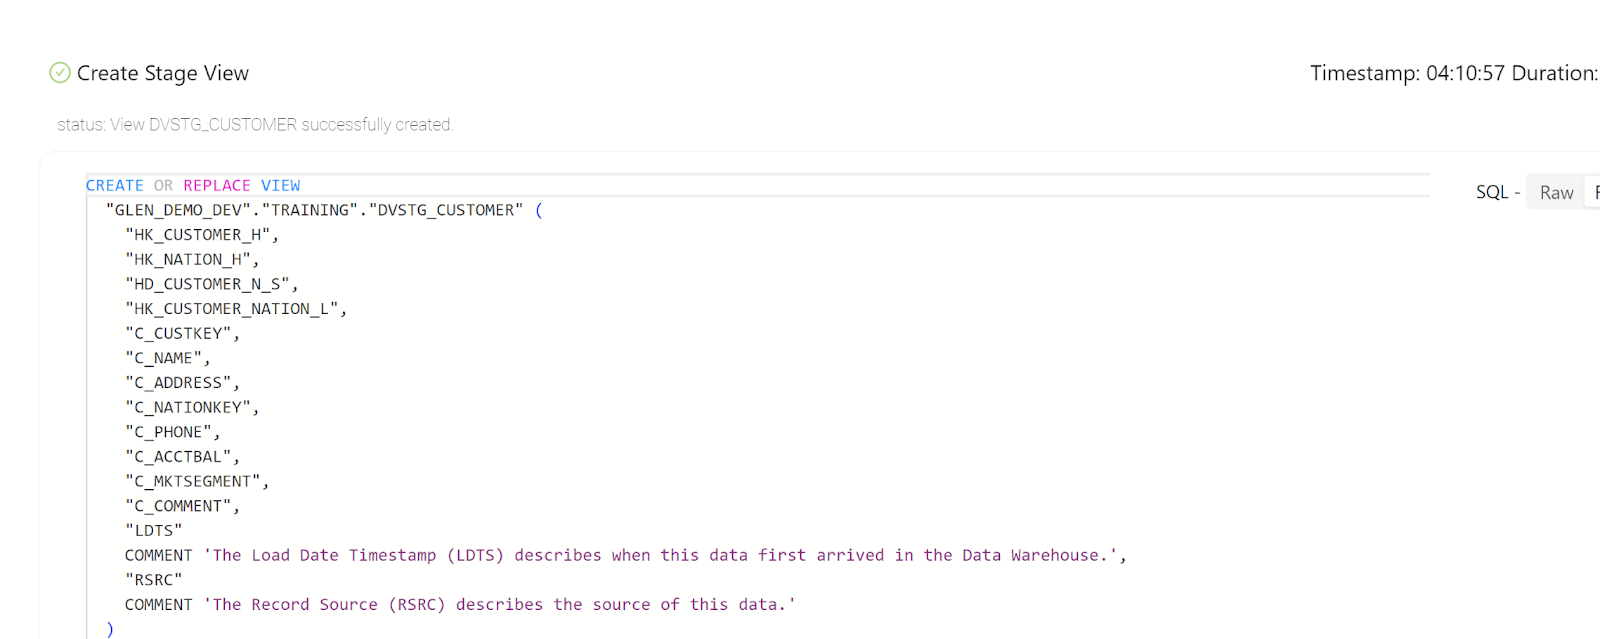
- Click Create, to recreate the view.
- Click Fetch Data, to review the columns (including new Hash Keys).
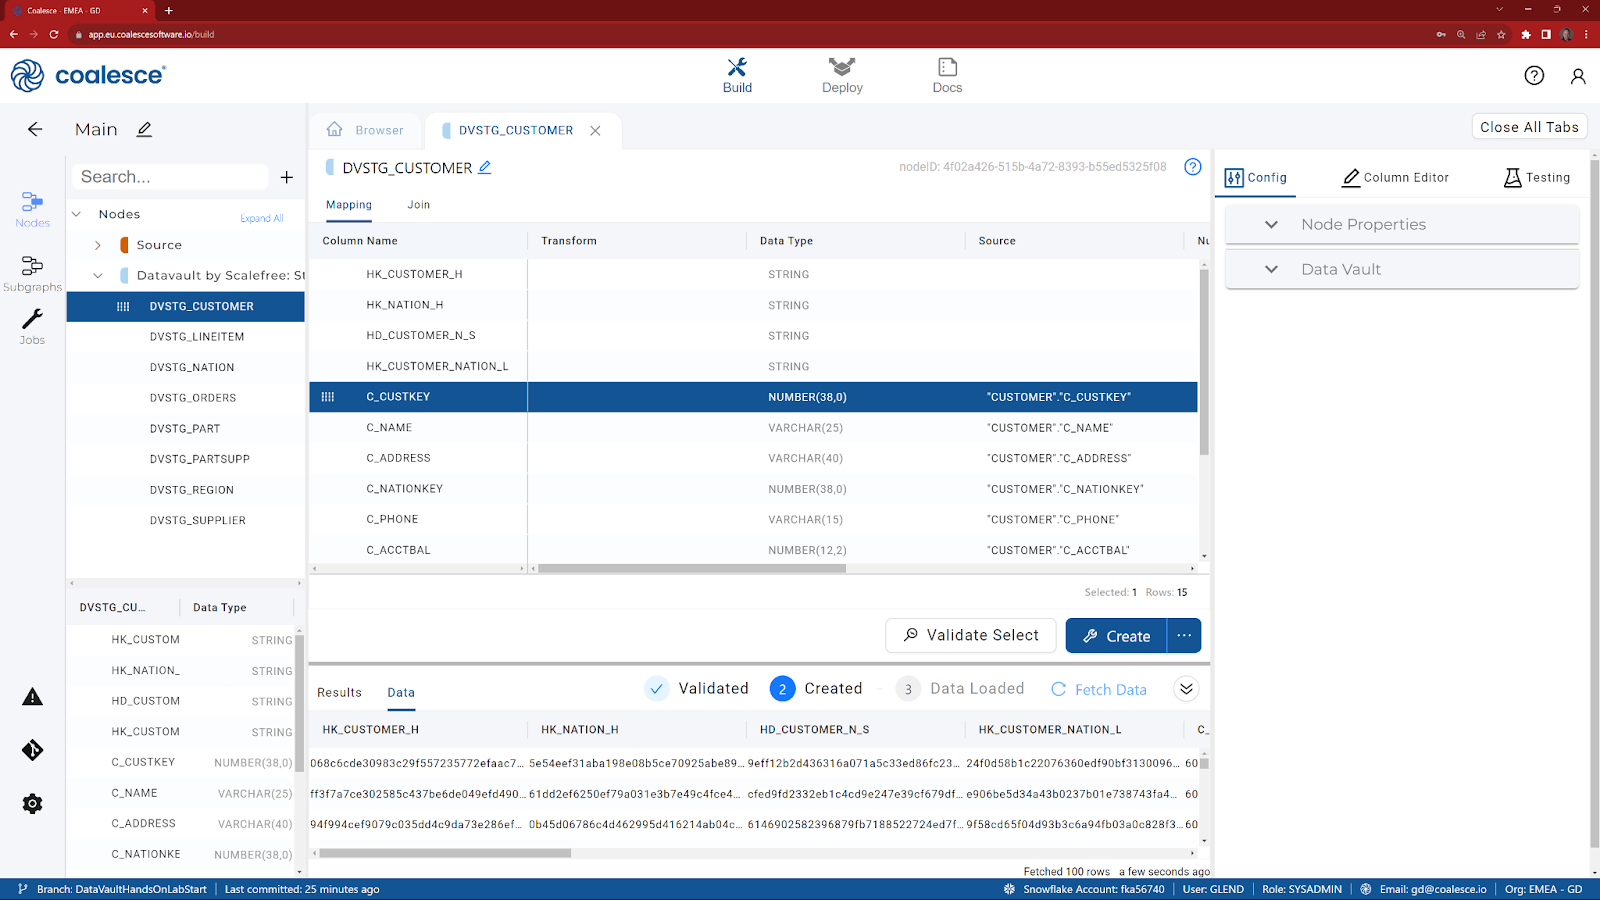
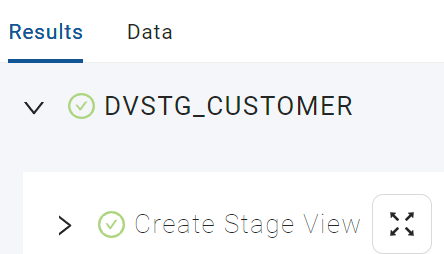
- Optionally, review the code from the Results tab, by clicking on the icon next to ‘Create Stage View':
Now that we have defined the Hash Keys in our Data Vault Staging node, we can very easily build our Data Vault objects, starting with a Hub.
- Return to the Browser tab to view your main graph
- Double click on DVSTG_CUSTOMER to reveal the columns.
- Multi-select the columns that are required for a Hub (holding the CTRL key down, select HK_CUSTOMER_H, C_CUSTKEY, LDTS and RSRC) and choose Add Node.
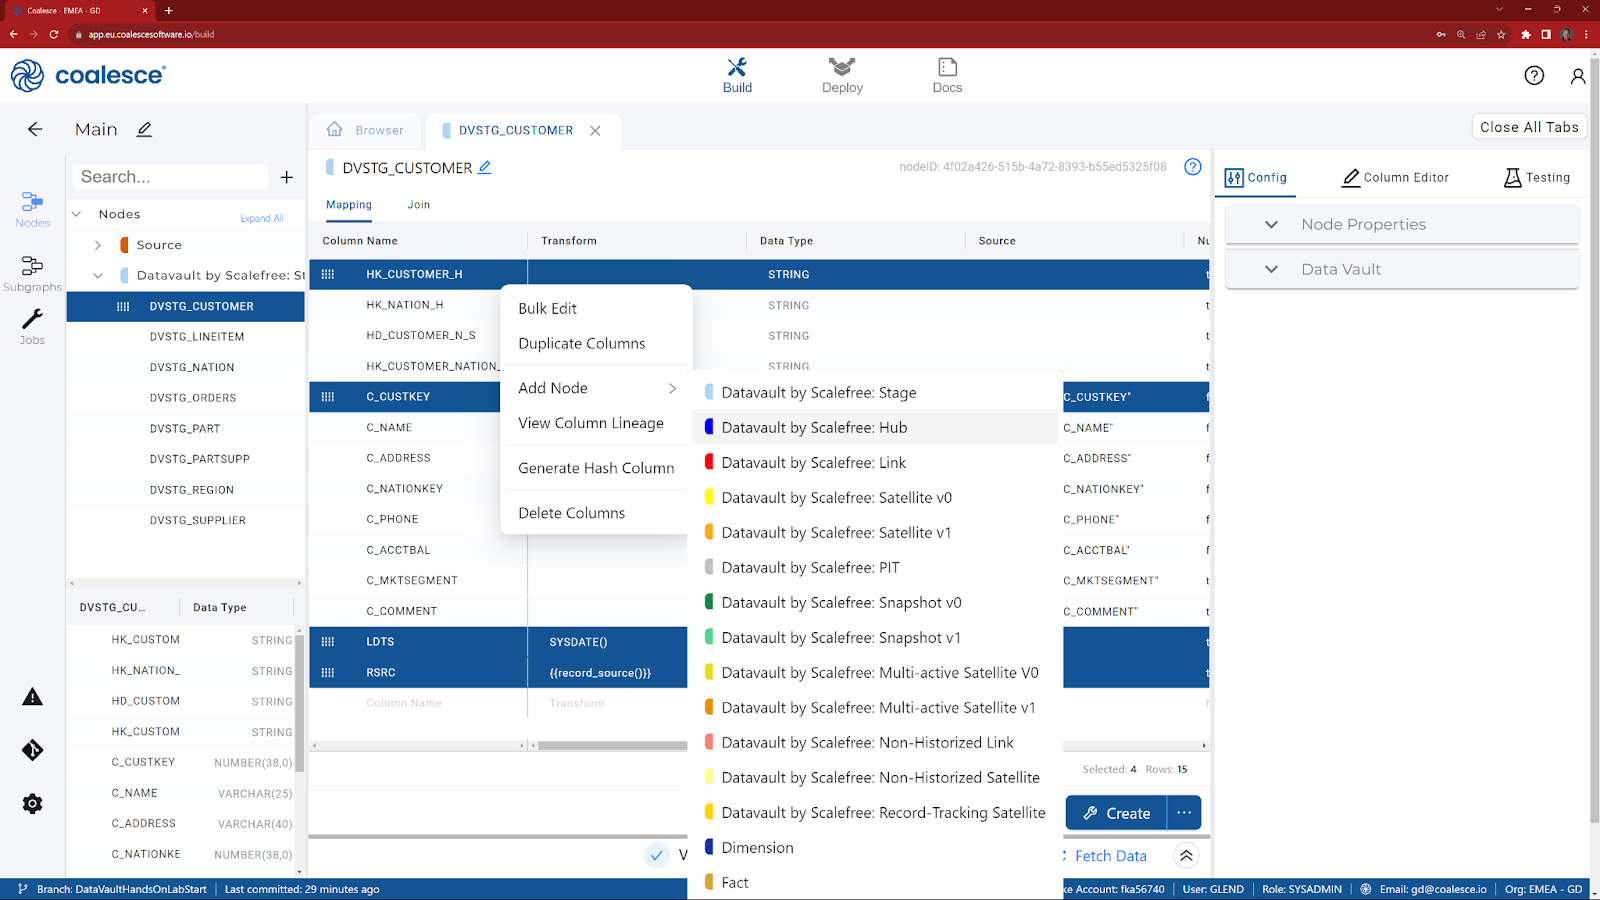
- Choose Datavault by Scalefree: Hub.
- If HK_CUSTOMER_H isn't already at the top (based on the positioning from the previous node), drag it to the top.
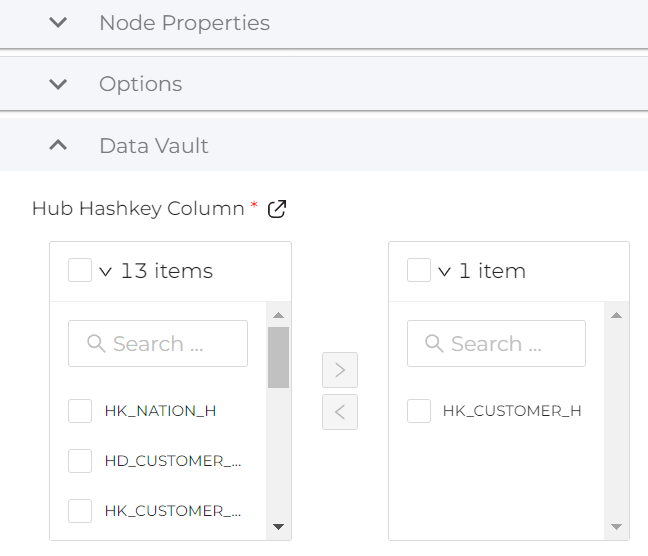
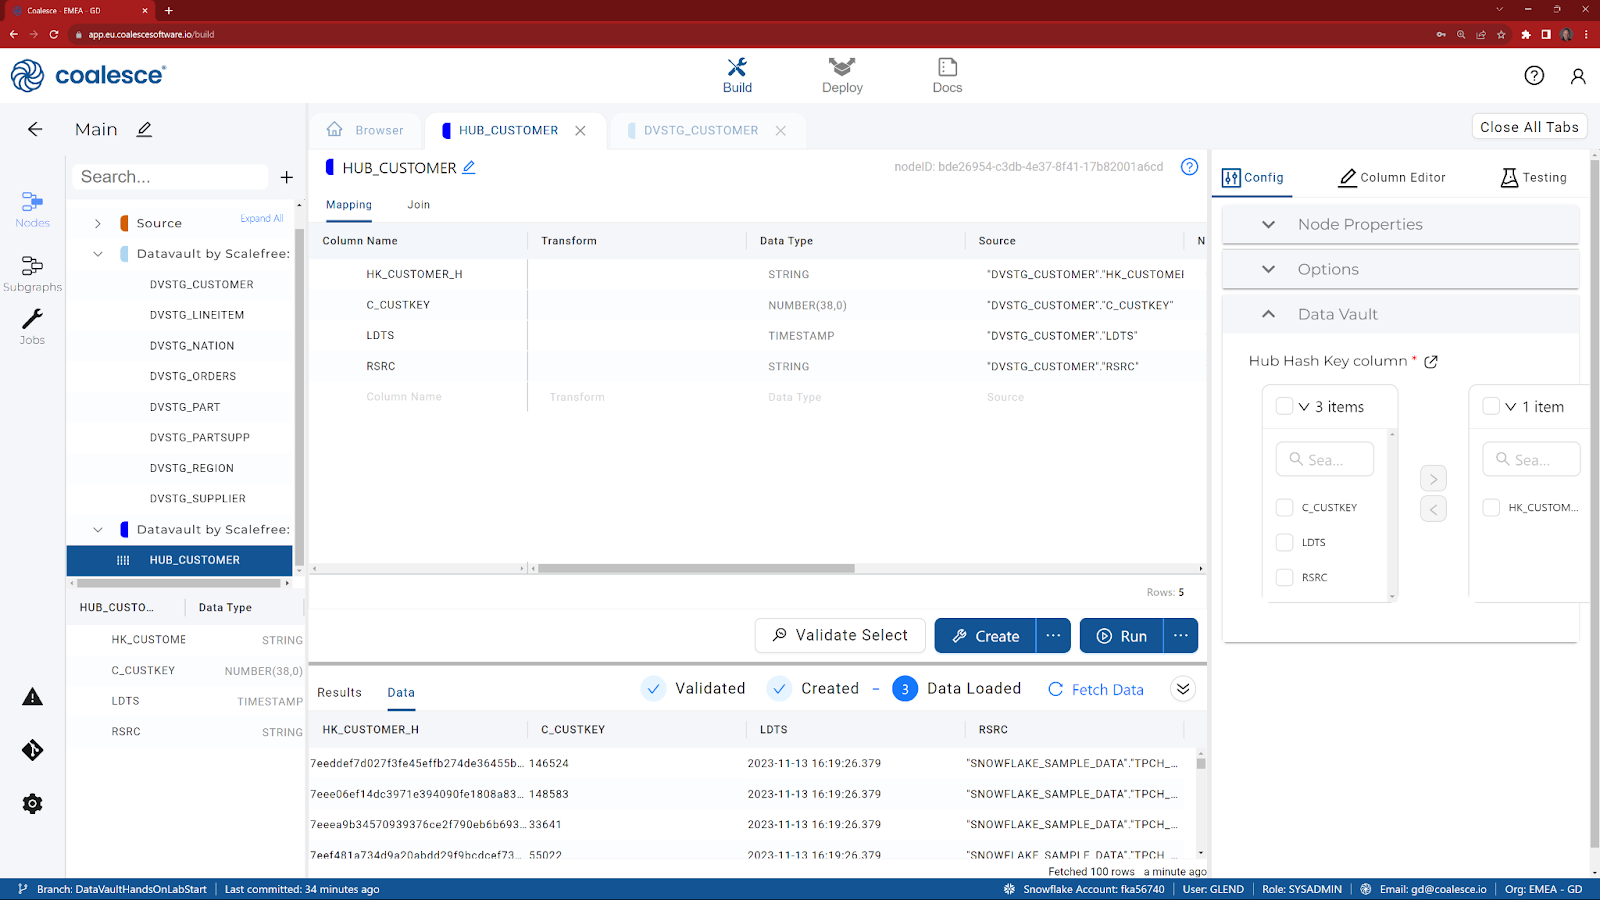
- In the Config tab on the right hand side, expand Data Vault.
- Select HK_CUSTOMER_H from the list and then click on the icon to move it to the right (selecting it as the Hub Hashkey Column).
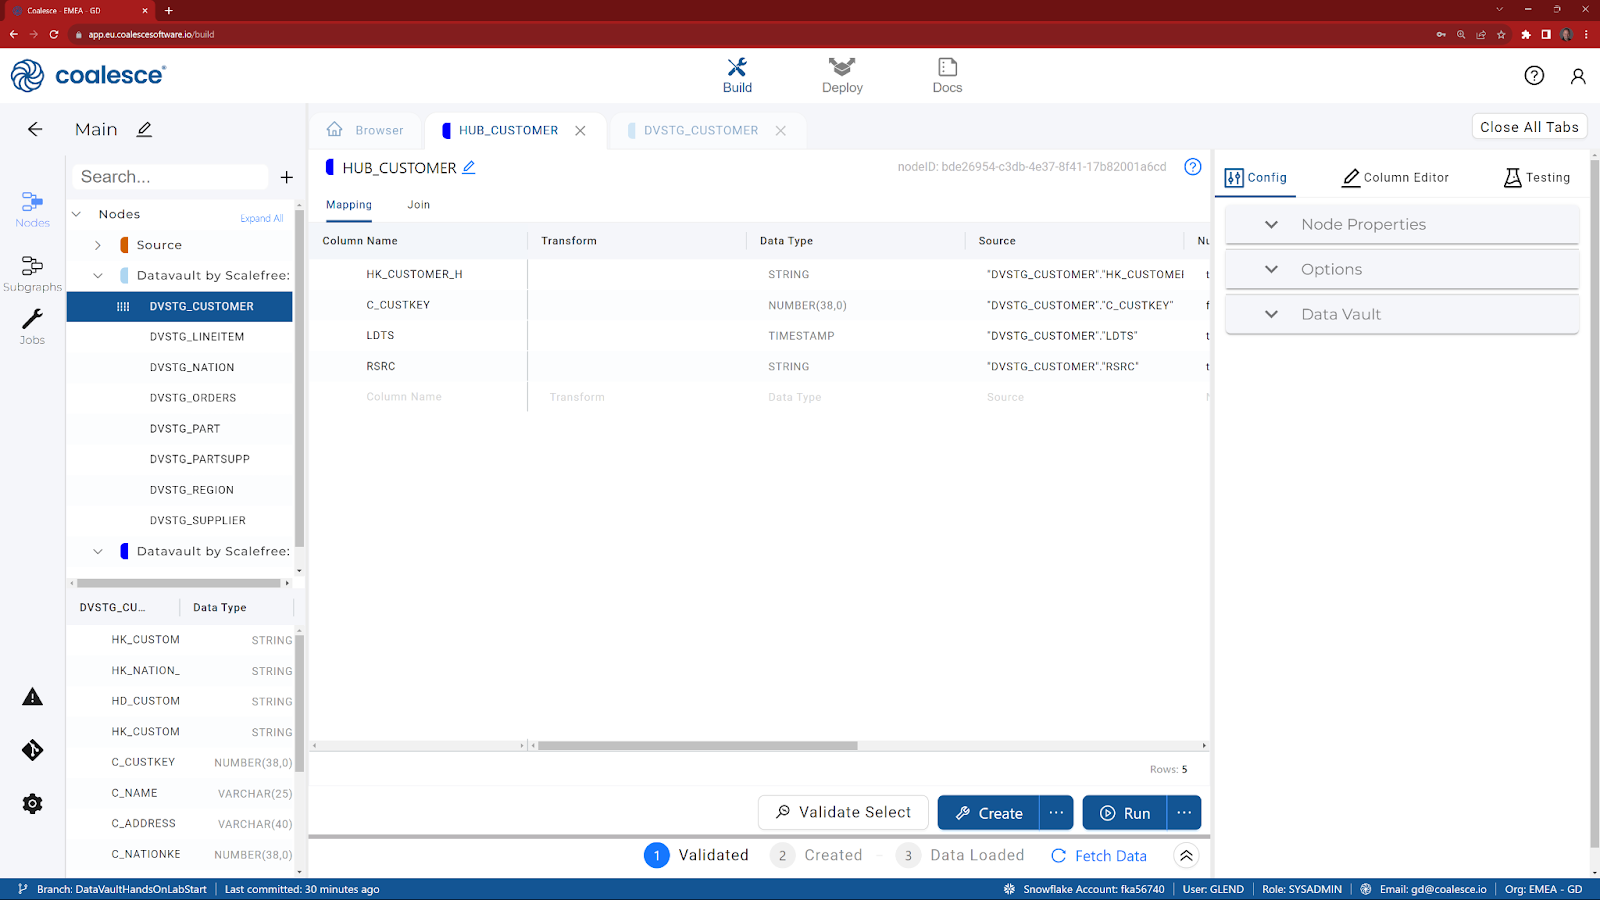
- Click on the Create button to create the table in Snowflake.
- Click on the Run button to execute the code.
- Review the Data tab to ensure the data is loaded correctly.
Now that we have built our first Hub, we can build a corresponding Customer satellite.
- Return to the browser tab (main graph).
- Double click on DVSTG_CUSTOMER to reveal the columns.
- Multi-select the columns that are required for a Satellite (holding the CTRL key down, select HK_CUSTOMER_H, HD_CUSTOMER_N_S, C_NAME, C_ADDRESS, C_PHONE, C_ACCTBAL, C_MKSEGMENT, C_COMMENT, LDTS and RSRC) and choose Add Node.
- Choose Datavault by Scalefree: Satellite V0.
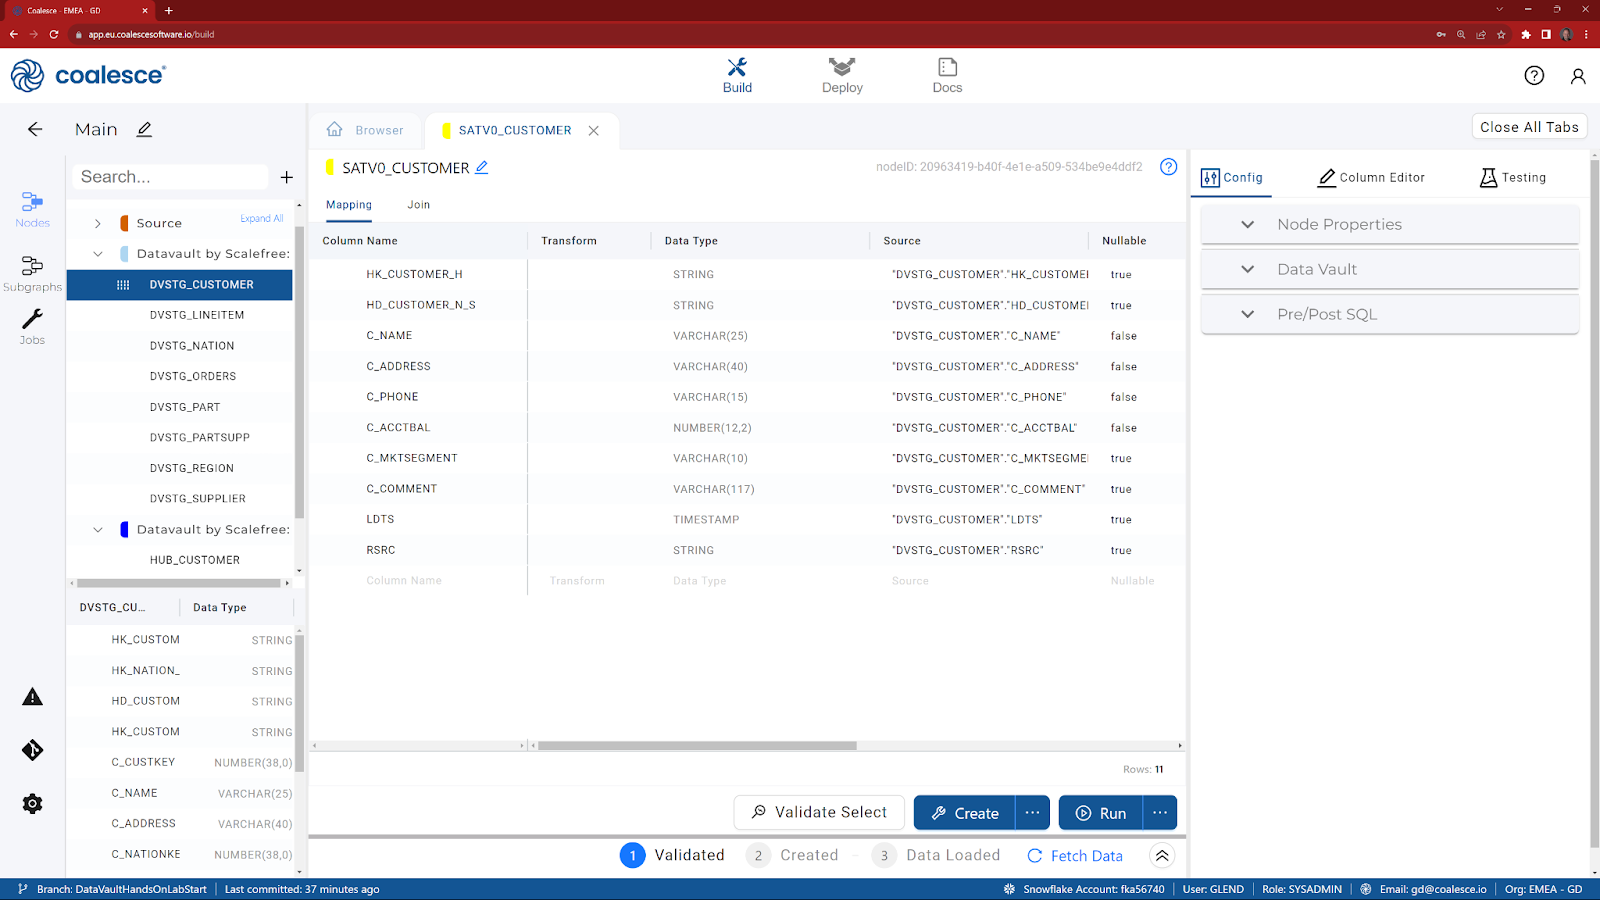
- If HK_CUSTOMER_H and HD_CUSTOMER_N_S are not already at the top (based on the positioning from the previous node), drag them to the top.
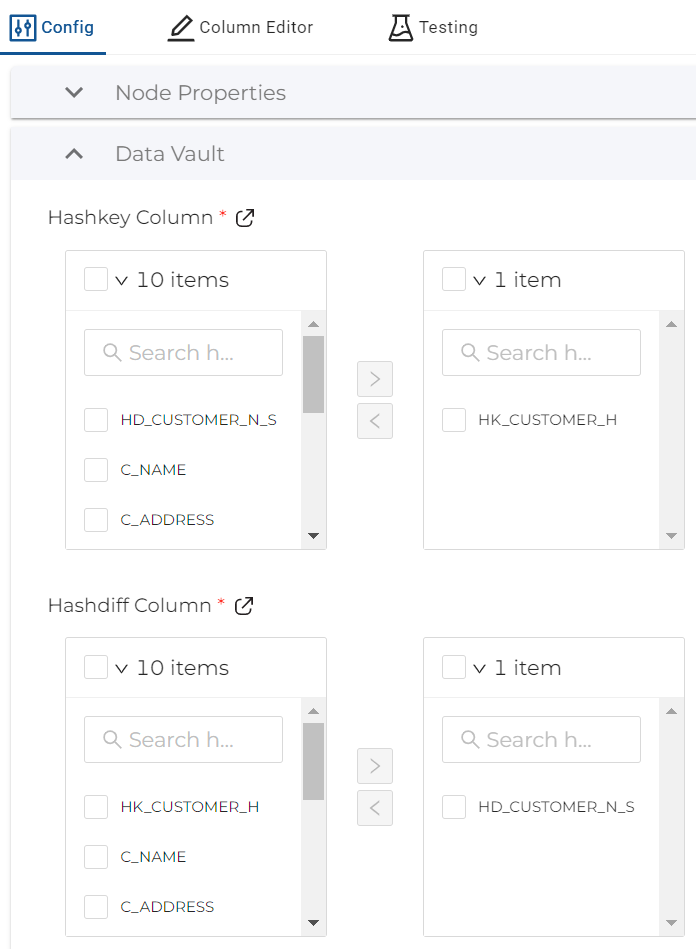
- In the Config tab on the right hand side, expand Data Vault and under the ‘Haskey Column' selection, select HK_CUSTOMER_H from the list and then click on the icon to move it to the right.
- Still in the Config tab and within the Data Vault section, navigate to the ‘Hashdiff Column' selection, select HD_CUSTOMER_N_S from the list and move it to the right.
- Click on the Create button to create the table in Snowflake.
- Click on the Run button to execute the code.
- Review the data in the Satellite.

To make it easier to query the historical data in our Satellite, we are now going to create a V1 Satellite that will give us a current flag and end date (based on window functions). This will be created as a view in Snowflake, pointing to our physical Satellite.
- Return to the browser tab (main graph).
- Right click on SATV0_CUSTOMER and choose Add Node.
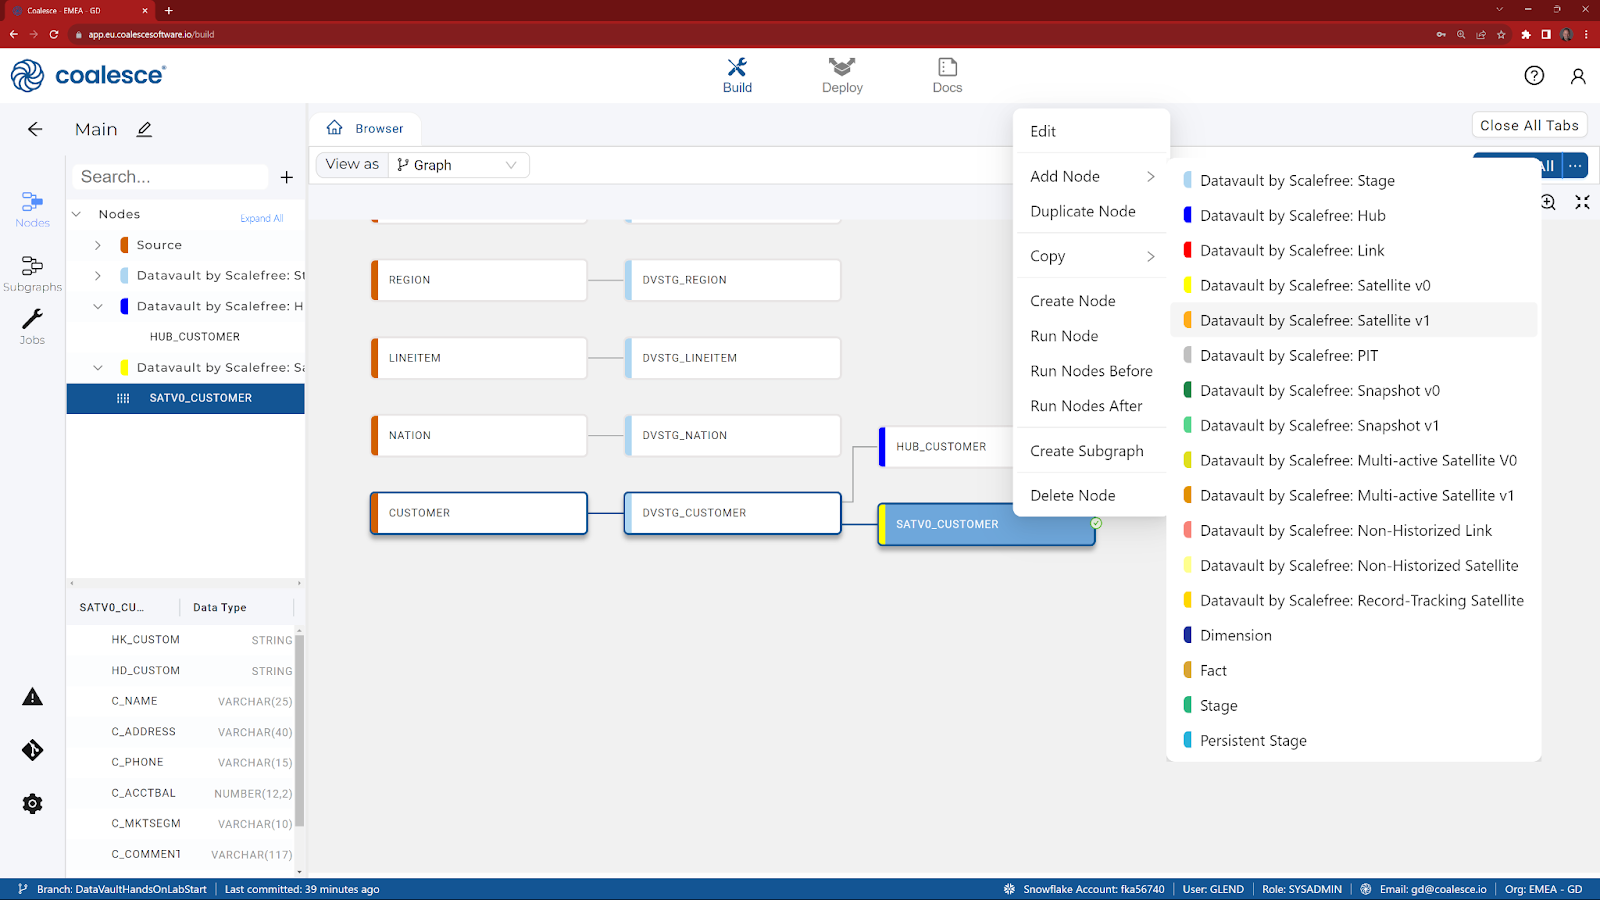
- Choose Datavault by Scalefree: Satellite V1.
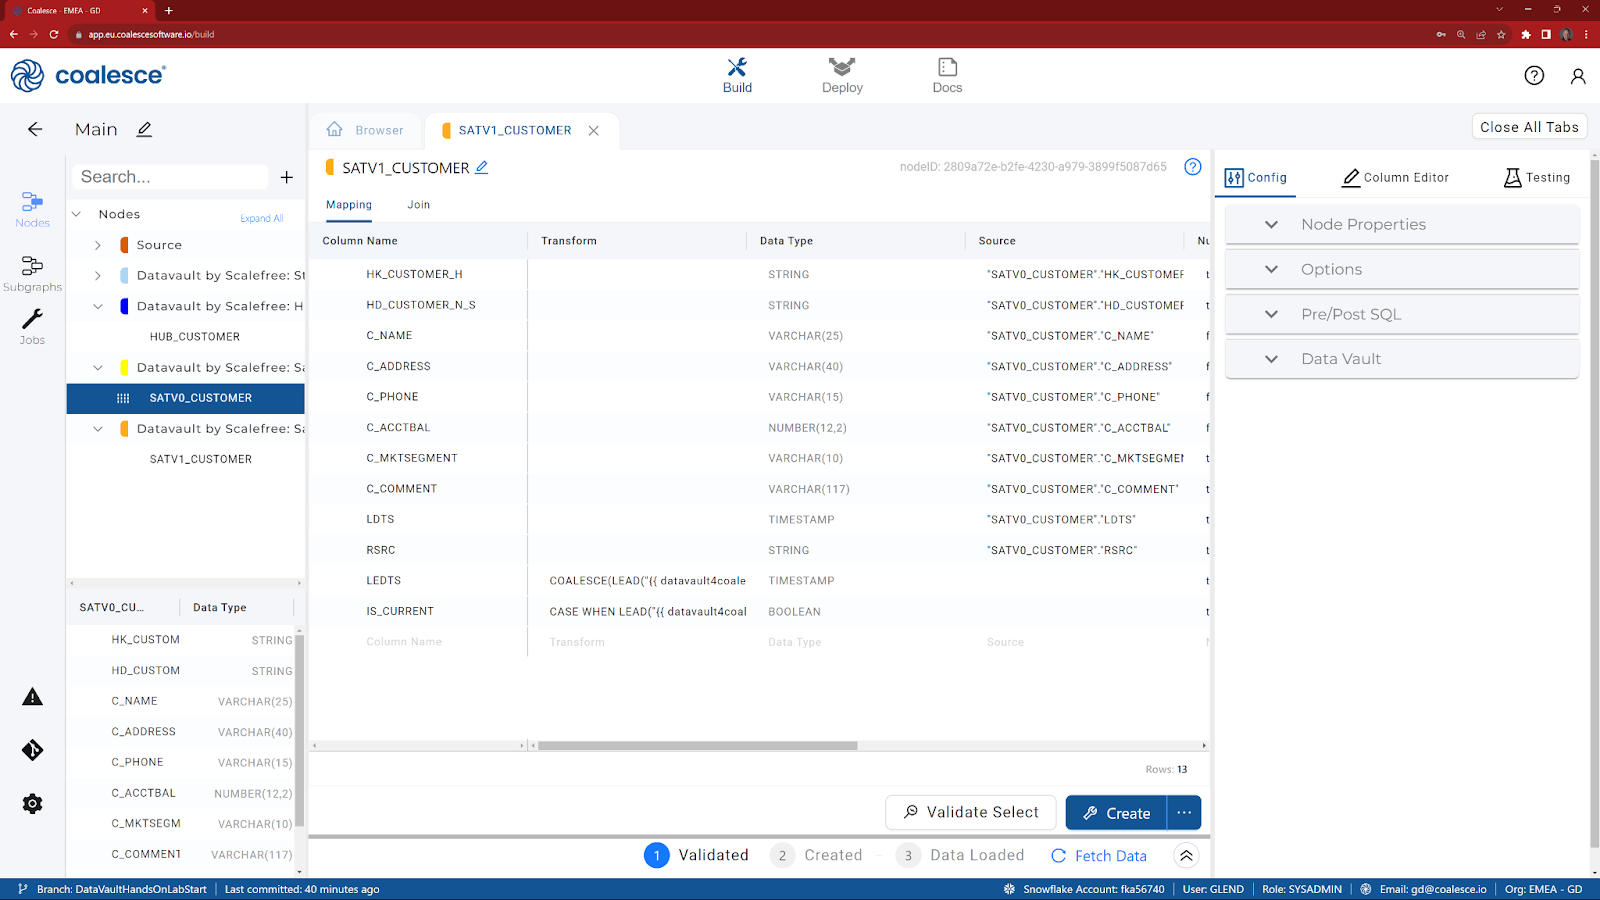
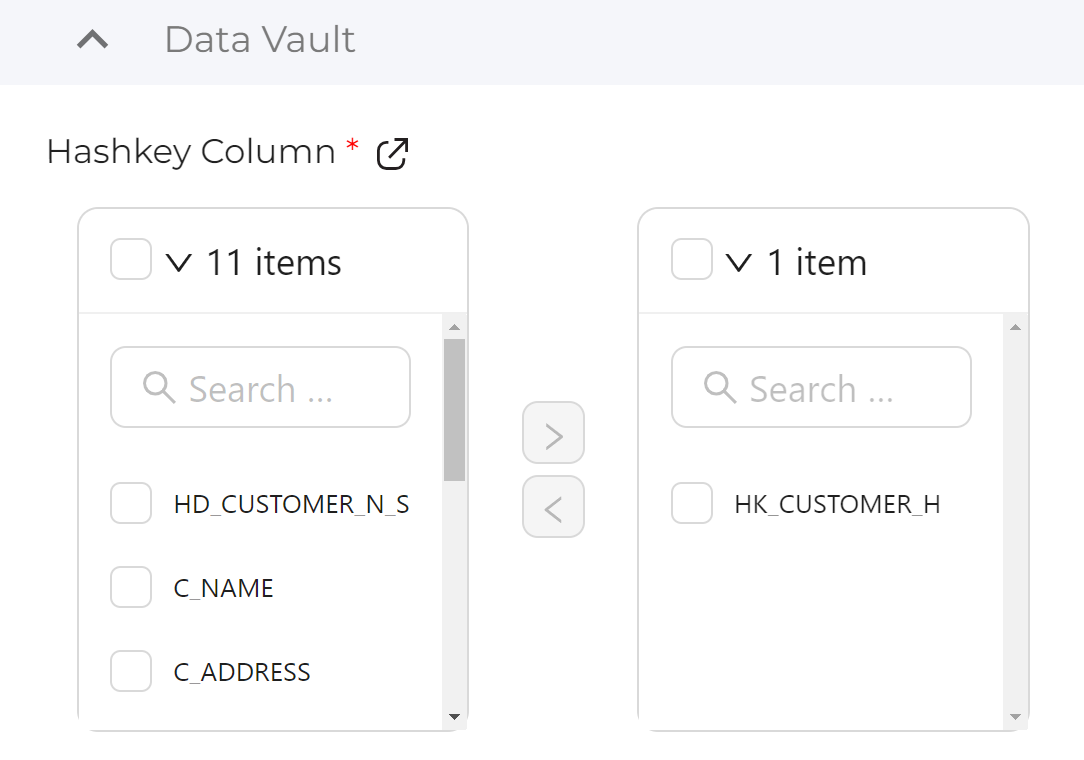
- In the Data Vault section of the Config, choose HK_CUSTOMER_H as the ‘Hashkey Column' and move it to the right.
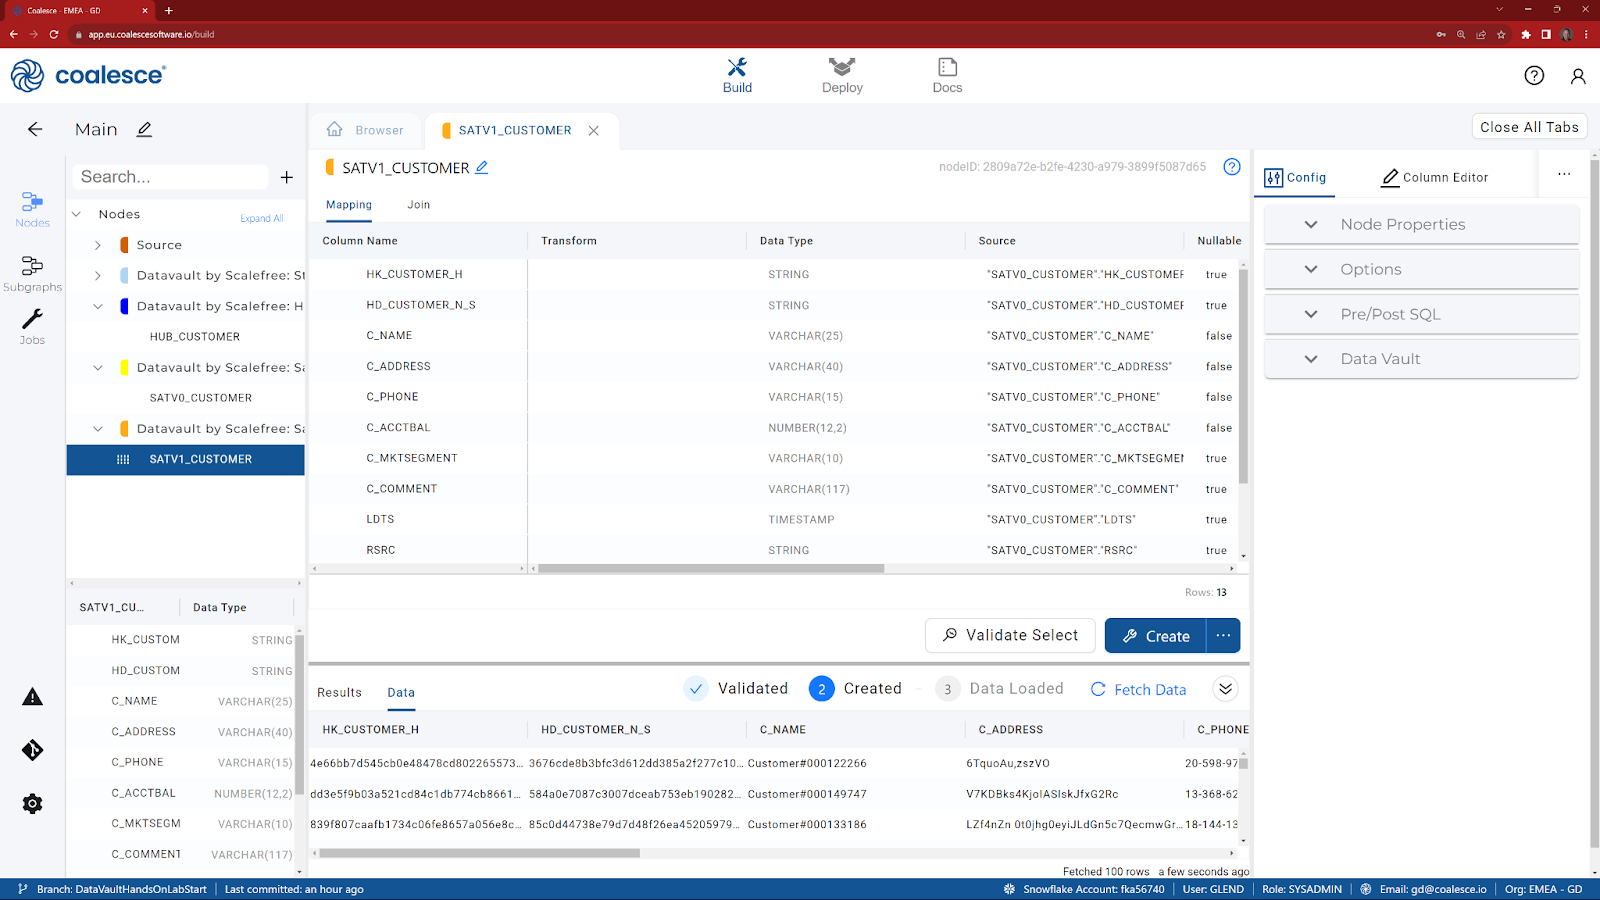
- Click on Create, to create the view in Snowflake.
- Click on Fetch Data to review the results.
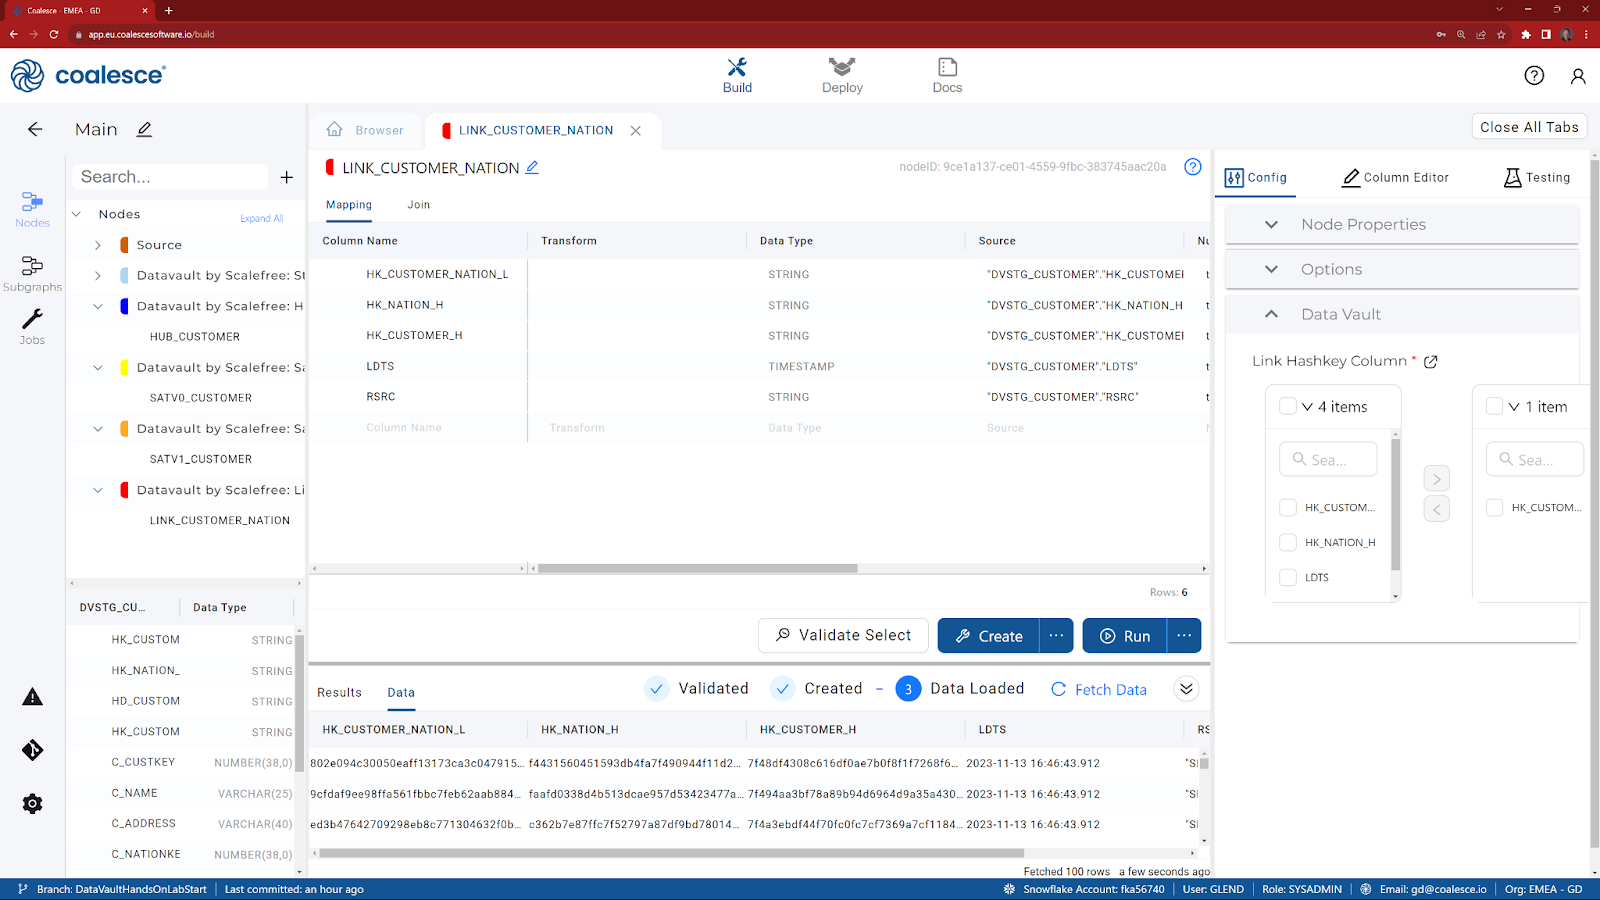
Our Customer source table contains a foreign key to the Nation table. If you built the optional Nation Hub Hash and Link Hash keys in previous sections of the guide, then you can continue on to build a Link table.
- Return to the Browser tab to view your main graph.
- Double click on DVSTG_CUSTOMER to reveal the columns.
- Multi-select the columns that are required for a Link (holding the CTRL key down, select HK_CUSTOMER_H, HK_NATION_H, HK_CUSTOMER_NATION_L, LDTS and RSRC) and choose Add Node.
- Choose Datavault by Scalefree: Link.
- Rename the node to be called Link_CUSTOMER_NATION

- Follow the same instructions as per the Satellite and Hub, but choose HK_CUSTOMER_NATION_L as the config item (Link Hashkey Column).
________________________________________________________________
Let's walk through some additional capabilities with a quick demo of:
- Loading data from an Excel file, using a Python based procedure
- Flattening JSON data into a stage table.
- How to apply data masking.
_________________________________________________________________
Now that we have built some basic components of a Raw Vault, we are going to join two of the tables together in preparation for building a dimensional table. In this step we are going to use a Stage table.
- Return to the Browser tab to view your main graph.
- Change the View as selector to Column Grid.
- Click on Show Filter.

- From the left hand side, expand nodes to find SATV1_CUSTOMER and HUB_CUSTOMER before dragging both of them onto the Include section at the top.
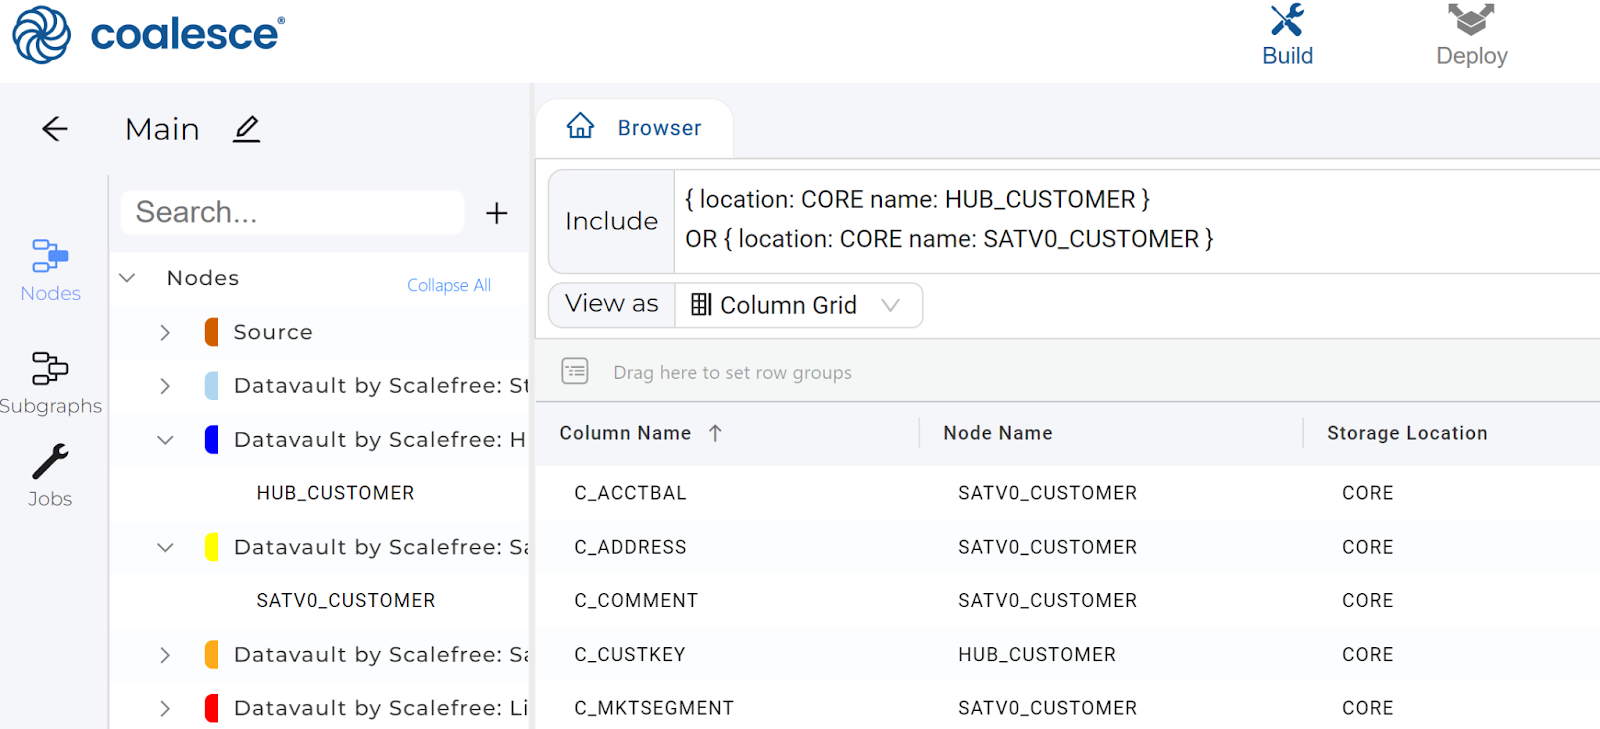
- Click on the Column Name header to sort the columns.
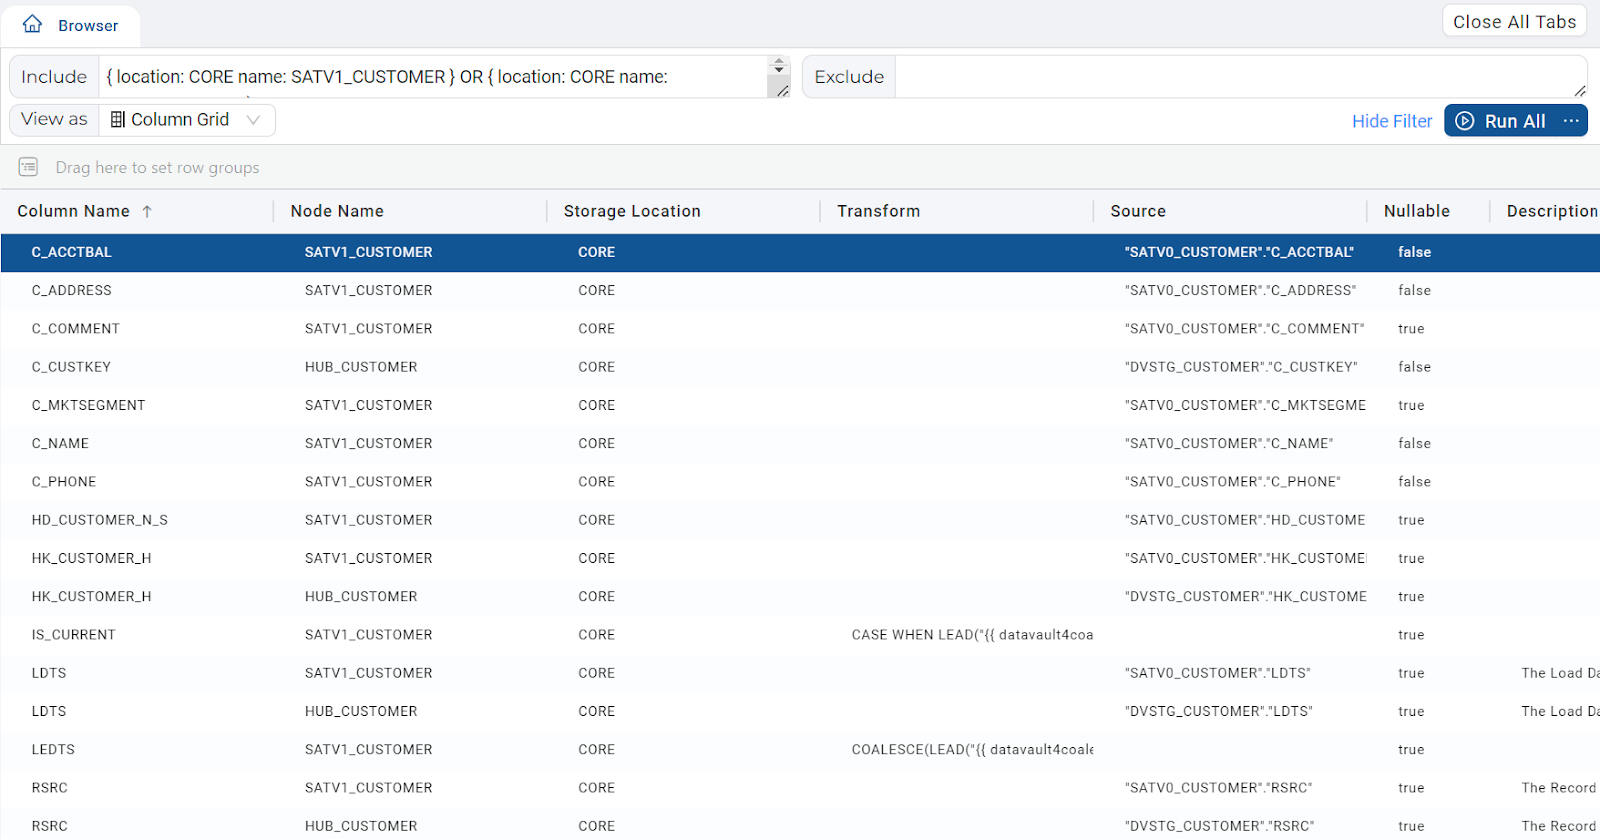
- Highlight all of the columns beginning C_, choose Add Node and select Stage.
- Click on the pencil icon, next to the table name and rename the table to STG_CUSTOMER.

- To join the Hub and Satellite data back together, click on the Join tab. This is where you can define the logic to join data from multiple nodes with the help of a generated Join statement.
- Add column relationships in the last line of the existing Join statement using the bolded code below:
FROM {{ ref('CORE', 'HUB_CUSTOMER') }} "HUB_CUSTOMER" INNER JOIN {{ ref('CORE', 'SATV1_CUSTOMER') }} "SATV1_CUSTOMER" ON "HUB_CUSTOMER"."HK_CUSTOMER_H" = "SATV1_CUSTOMER"."HK_CUSTOMER_H"
If you highlight and then delete the instances of ./*COLUMN*/ from the code and type ‘.', you can use autocomplete to select your columns.
- (Optional) Add the following WHERE clause to the code by typing the following:
WHERE "SATV1_CUSTOMER"."IS_CURRENT" = true
- To check if your statement is syntactically correct, press the white Validate Select button in the lower half of the screen. The Results panel should show a green checkmark, confirming that the SQL is accepted. If not, you will see a database message indicating the error.
- If there are no errors, click Create to create the table and then click Run to populate the table.
Now that we have a staging table containing our Customer data, we are going to demonstrate how Coalesce can be used to build SQL based transformations.
- Return to the Browser tab to view your main graph.
- Double click on STG_CUSTOMER.
- Duplicate the C_MKTSEGMENT column, by clicking on the name in the column list. Then, right click on the highlighted row and choose Duplicate Column.
- In the newly created column, change the name to C_CREDIT_STATUS.
- Click on the Transform column for the newly created C_CREDIT_STATUS and copy in the following code:
CASE WHEN "SATV1_CUSTOMER"."C_ACCTBAL" > 5000 AND "SATV1_CUSTOMER"."C_MKTSEGMENT" IN ('FURNITURE','AUTOMOBILE') THEN 'HIGH' ELSE 'LOW' END
- Click on Create to recreate the table.
- Click on Run to process the data.
- Fetch the data to review the new transformed column.
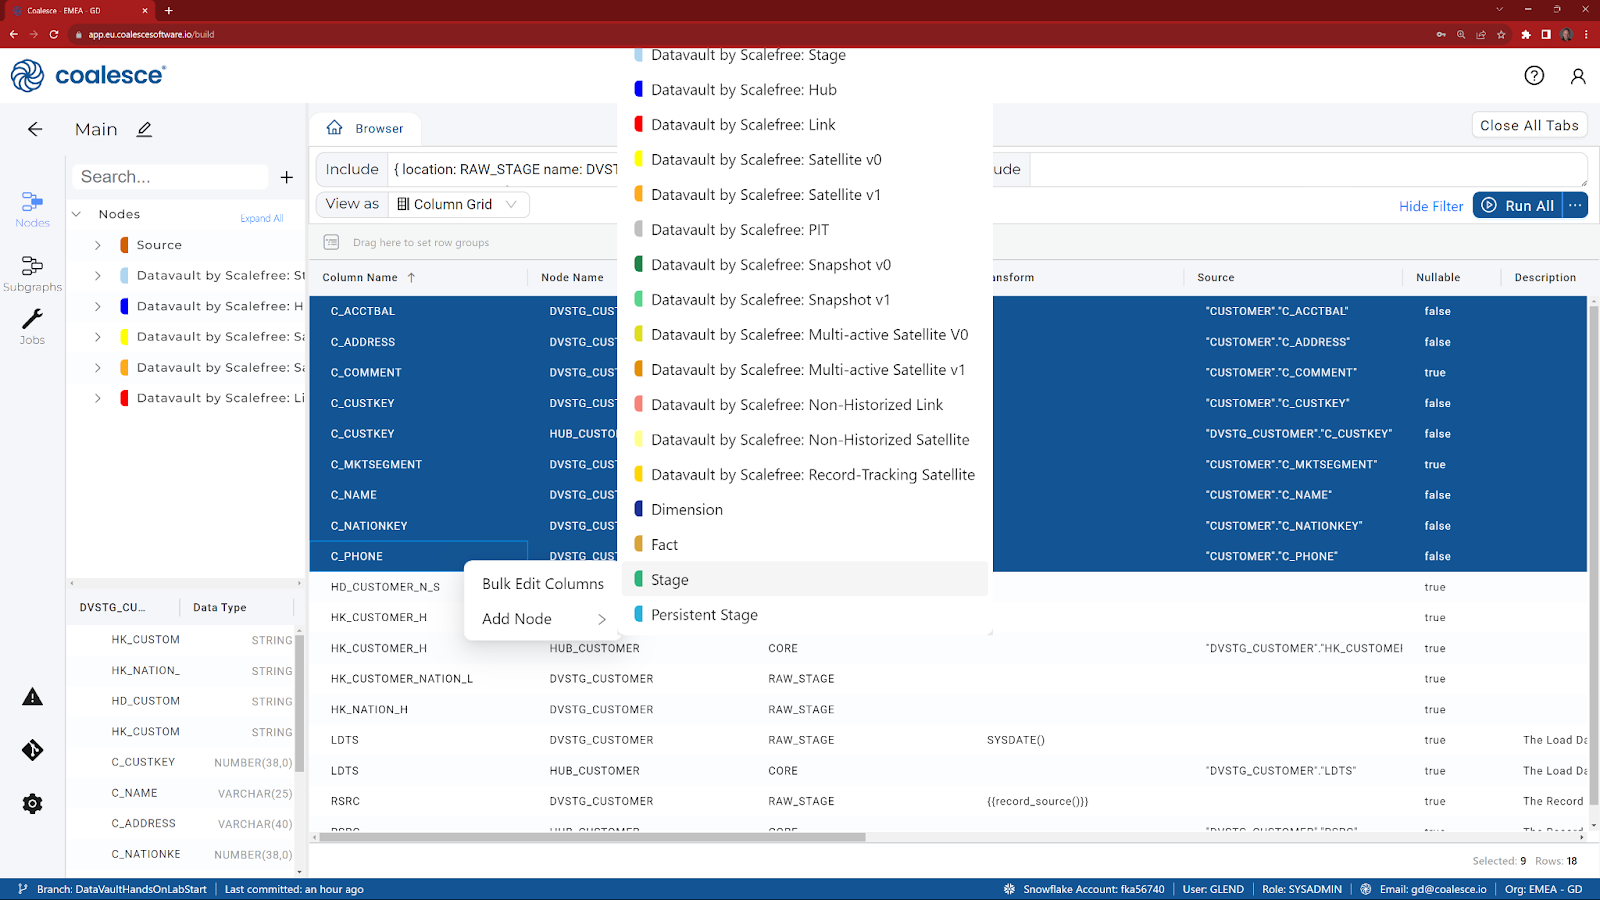
Currently our source tables contain technical column names – let's change them to be more user-friendly for our dimension node. Rather than having to do this on a column-by-column basis, we can change all of them using a snippet of Jinja code.
- Return to the Browser tab to view your main graph.
- Double click on STG_CUSTOMER.
- Select all of the columns.
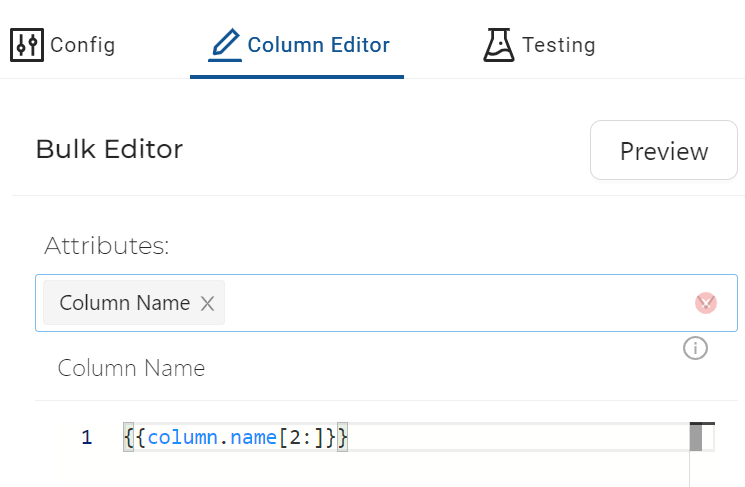
- Right click on any of the highlighted columns and choose Bulk Edit.
- In the Column Editor on the right hand side, choose Column Name under Attributes and type the following code (which removes the first two characters from the string):
{{column.name[2:]}}
- Then click on Preview to review the changes:
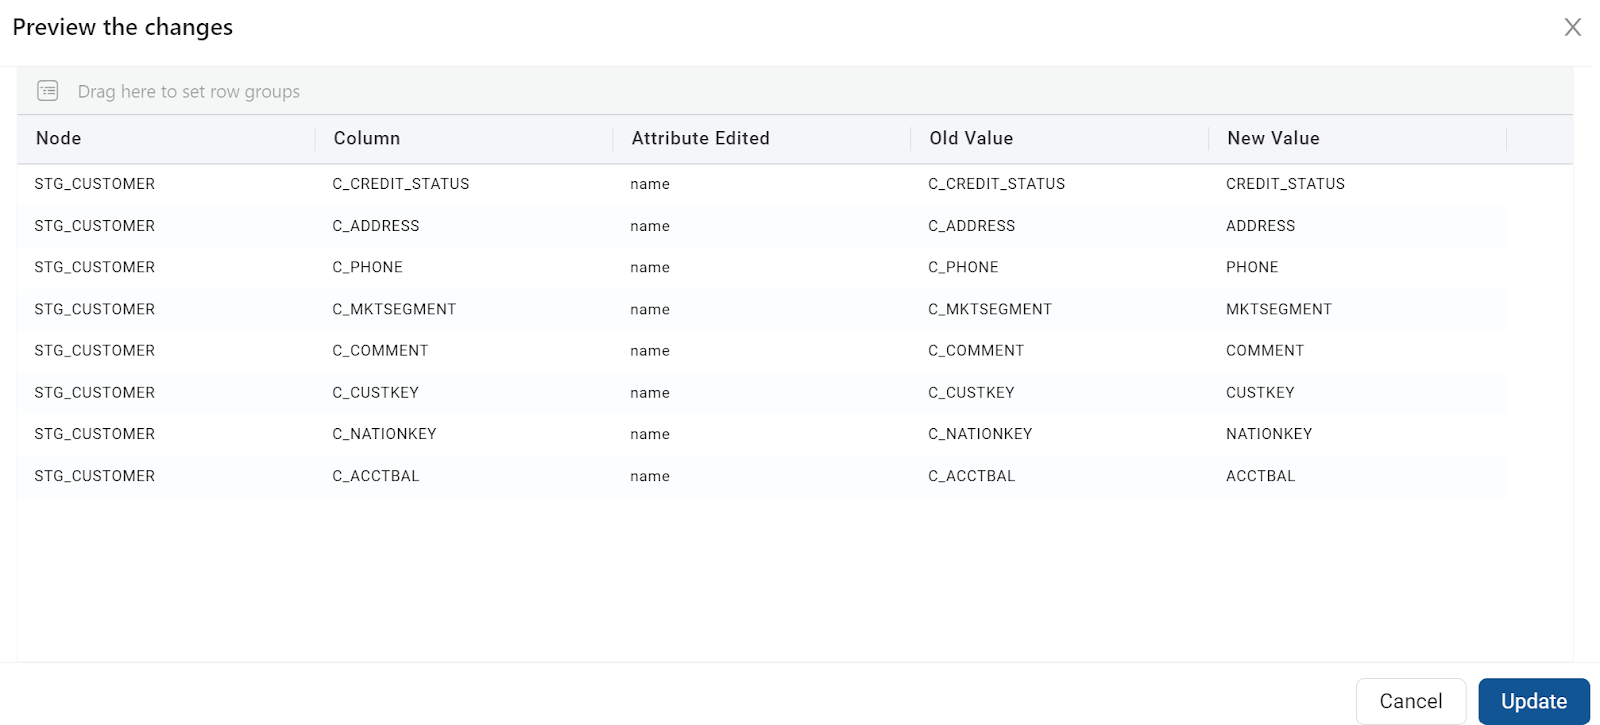
- If the name change looks correct, then click on Update to change the columns.
- Click on Create to re-create the table in Snowflake.
- Click on Run to process the data.
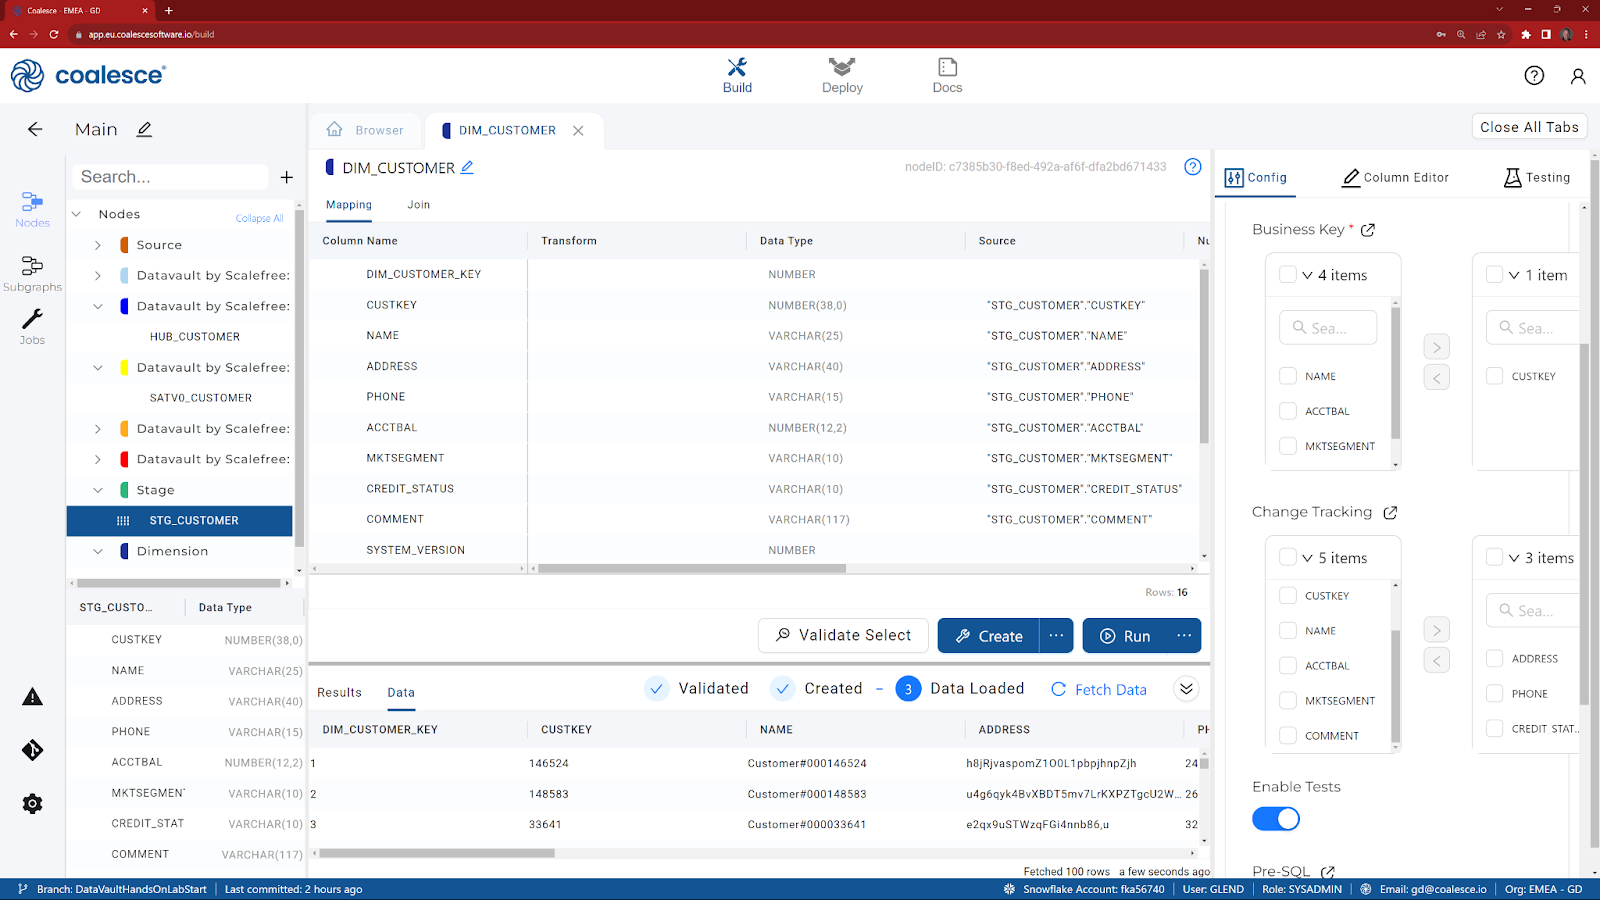
Now that we have staged our customer data, we are ready to build a dimension node. As we've completed all the hard work already, this will be a simple process.
- Return to the Browser tab to view your main graph.
- Right click on STG_CUSTOMER and choose Add Node.
- Choose Dimension.
- Observe the system columns that have been added by default, including a surrogate key and start / end dates for the Type II change tracking functionality.
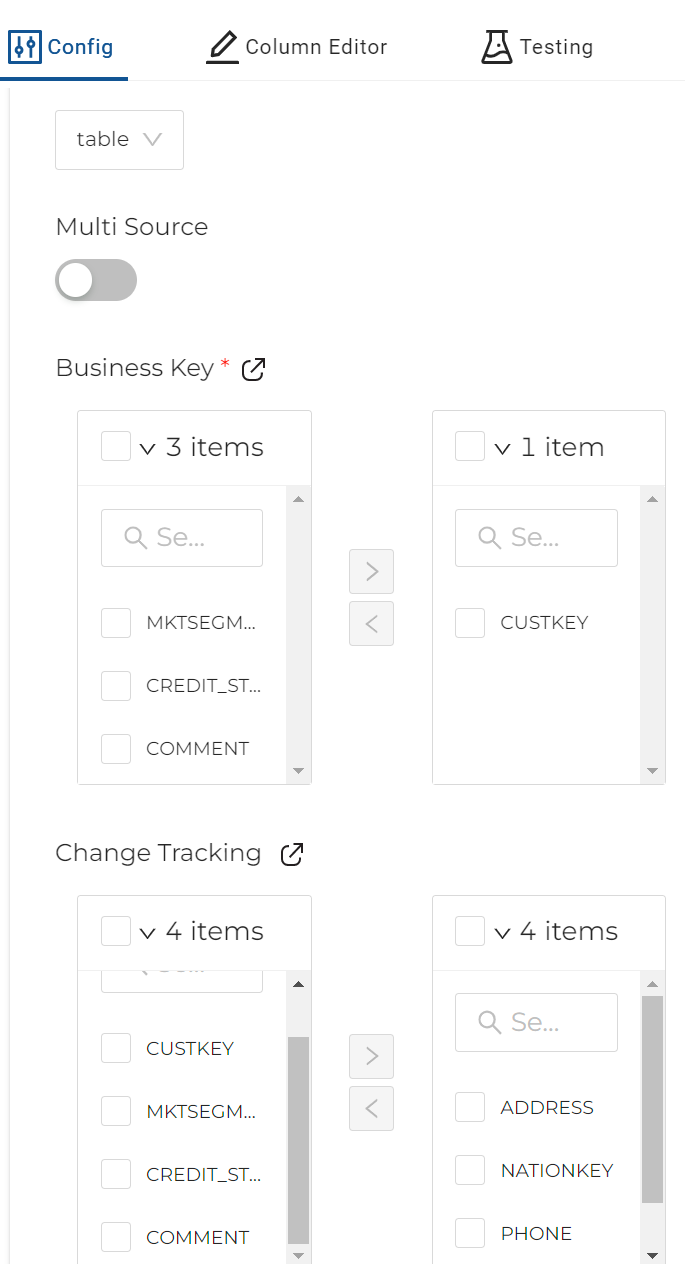
- In the Config section, expand Options and select CUSTKEY for the Business Key option and then any other column(s) for Change Tracking. If no change tracking columns are chosen, then this dimension will revert to Type I and will not track history.
- Click on Create to create the table in Snowflake.
- Click on Run to execute the code.
______________________________________________________________________________________________
Congratulations! You've successfully built out a raw data vault in Coalesce.
What we've covered
- Creating Data Vault stage nodes
- Adding Hash columns and building hash keys
- Adding Hubs, Satellites, and Links
- Joining and transforming data
- Creating a Type II dimension
For our closing demo, we will review how to:
- Commit to GIT
- Deploy your pipeline
- Create Subgraphs
- Create and run Jobs
______________________________________________________________________________________________
______________________________________________________________________________________________